更多SpringBoot3内容请关注我的专栏:《SpringBoot3》
期待您的点赞??收藏评论
整合 Elasticsearch 8.x (二)使用Repository
- 1. 环境准备
-
- 1.1 项目依赖
- 1.2 Elasticsearch 配置
- 2. 使用Repository的基本步骤
-
- 2.1 创建实体类
- 2.2 创建 Repository 接口
-
- 2.2.1 主要作用和优点
- 2.2.2 使用场景
- 2.3 服务层实现
- 2.4 控制器层
- 3. 测试应用
-
- 3.1 启动 Elasticsearch
- 3.2 启动 Spring Boot 应用
- 3.3 测试 API
- 4. 总结
上一篇文章介绍了 Spring Boot 3 整合 Elasticsearch 8.x 的几种客户端形式,除此之外,Spring Data 对 Elasticsearch 还提供了 Repository 支持,与前面讨论的JPA Repository 一样,其基本原理是根据方法名称自动为你构建查询,提供了更简便的数据搜索和分析功能。本文将介绍如何使用 Spring Data Elasticsearch Repository 来构建一个简单的搜索应用。
1. 环境准备
1.1 项目依赖
在 pom.xml 中添加以下依赖:
<dependency><groupId>org.springframework.boot</groupId><artifactId>spring-boot-starter-data-elasticsearch</artifactId>
</dependency>
确保 spring-boot-starter-data-elasticsearch 的版本与 Spring Boot 3 兼容。
1.2 Elasticsearch 配置
在 application.properties 或 application.yml 中配置 Elasticsearch 的连接信息:
spring:elasticsearch:uris: "http://localhost:9200"socket-timeout: "10s"username: "user"password: "secret"
2. 使用Repository的基本步骤
2.1 创建实体类
我们定义一个 Product 实体类,表示产品信息:
package com.coderjia.boot318es.bean;import lombok.AllArgsConstructor;
import lombok.Data;
import org.springframework.data.annotation.Id;
import org.springframework.data.elasticsearch.annotations.Document;/*** @author CoderJia* @create 2024/11/3 下午 04:37* @Description**/
@Data
@Document(indexName = "products")
@AllArgsConstructor
public class Product {@Idprivate String id;private String name;private String description;private double price;
}
2.2 创建 Repository 接口
ElasticsearchRepository 是 Spring Data Elasticsearch 提供的一个接口,用于简化与 Elasticsearch 交互的操作。它继承自 CrudRepository 和 PagingAndSortingRepository,扩展了基本的 CRUD(创建、读取、更新、删除)功能,支持分页和排序,还提供了对 Elasticsearch 特有的操作支持。使用 ElasticsearchRepository,开发者可以快速构建功能全面的数据访问层,而无需编写复杂的 Elasticsearch 客户端代码。
2.2.1 主要作用和优点
- 简化数据操作:提供了基础的 CRUD 方法,如
save()、findById()、findAll()和deleteById()等,方便开发者直接使用。 - 自定义查询:通过定义接口中的方法(如
findByName(String name)),可以自动生成符合方法命名规范的查询。 - 分页与排序:内置了分页和排序支持,方法如
findAll(Pageable pageable)可以直接返回分页数据。 - 与 Spring 无缝集成:使用 Spring 的依赖注入和配置机制,无需手动创建或管理客户端连接。
- 减少代码复杂度:自动实现常用的数据库操作,减少重复代码,提高开发效率。
2.2.2 使用场景
- 需要快速实现基于 Elasticsearch 的应用程序,且不希望编写底层客户端调用代码。
- 开发中涉及到简单或中等复杂度的查询,使用方法命名约定生成查询即可满足需求。
- 项目中需要分页、排序功能而不想手动处理分页逻辑。
定义 ProductRepository 接口,继承 ElasticsearchRepository:
package com.coderjia.boot318es.dao;import com.coderjia.boot318es.bean.Product;
import org.springframework.data.elasticsearch.repository.ElasticsearchRepository;import java.util.List;/*** @author CoderJia* @create 2024/11/4 下午 09:29* @Description**/
public interface ProductRepository extends ElasticsearchRepository<Product, String> {/*** 自定义通过name查询** @param name* @return*/List<Product> findByName(String name);
}
2.3 服务层实现
在服务层中实现增删改查的业务逻辑:
package com.coderjia.boot318es.service;import com.coderjia.boot318es.bean.Product;
import com.coderjia.boot318es.dao.ProductRepository;
import jakarta.annotation.Resource;
import org.springframework.data.domain.Page;
import org.springframework.data.domain.Pageable;
import org.springframework.stereotype.Service;import java.util.List;
import java.util.Optional;/*** @author CoderJia* @create 2024/11/4 下午 09:29* @Description**/
@Service
public class ProductService {@Resourceprivate ProductRepository productRepository;// 创建或更新产品public Product saveProduct(Product product) {return productRepository.save(product);}// 根据 ID 查询产品public Optional<Product> findById(String id) {return productRepository.findById(id);}// 根据名称查询产品public List<Product> findByName(String name) {return productRepository.findByName(name);}// 获取所有产品public Page<Product> findAll(Pageable pageable) {return productRepository.findAll(pageable);}// 删除产品public void deleteProduct(String id) {productRepository.deleteById(id);}
}
2.4 控制器层
在控制器层实现 REST API 接口,处理增删改查请求:
package com.coderjia.boot318es.controller;import com.coderjia.boot318es.bean.Product;
import com.coderjia.boot318es.service.ProductService;
import jakarta.annotation.Resource;
import org.springframework.data.domain.Page;
import org.springframework.data.domain.PageRequest;
import org.springframework.data.domain.Pageable;
import org.springframework.web.bind.annotation.DeleteMapping;
import org.springframework.web.bind.annotation.GetMapping;
import org.springframework.web.bind.annotation.PathVariable;
import org.springframework.web.bind.annotation.PostMapping;
import org.springframework.web.bind.annotation.RequestBody;
import org.springframework.web.bind.annotation.RequestMapping;
import org.springframework.web.bind.annotation.RequestParam;
import org.springframework.web.bind.annotation.RestController;import java.util.List;
import java.util.Optional;/*** @author CoderJia* @create 2024/11/4 下午 09:30* @Description**/
@RestController
@RequestMapping("/products")
public class ProductController {@Resourceprivate ProductService productService;// 创建或更新产品@PostMappingpublic Product createOrUpdateProduct(@RequestBody Product product) {return productService.saveProduct(product);}// 根据 ID 查询产品@GetMapping("/{id}")public Optional<Product> getProductById(@PathVariable String id) {return productService.findById(id);}// 根据名称查询产品@GetMapping("/search")public List<Product> searchByName(@RequestParam String name) {return productService.findByName(name);}// 获取所有产品@GetMappingpublic List<Product> getAllProducts(@RequestParam(defaultValue = "0") int page,@RequestParam(defaultValue = "10") int size) {Pageable pageable = PageRequest.of(page, size);Page<Product> products = productService.findAll(pageable);return products.getContent();}// 删除产品@DeleteMapping("/{id}")public String deleteProduct(@PathVariable String id) {productService.deleteProduct(id);return "Product deleted successfully!";}
}
3. 测试应用
3.1 启动 Elasticsearch
确保 Elasticsearch 8.x 正在运行,并且可以通过 http://localhost:9200 访问。
3.2 启动 Spring Boot 应用
运行 Spring Boot 应用,确保没有错误。
3.3 测试 API
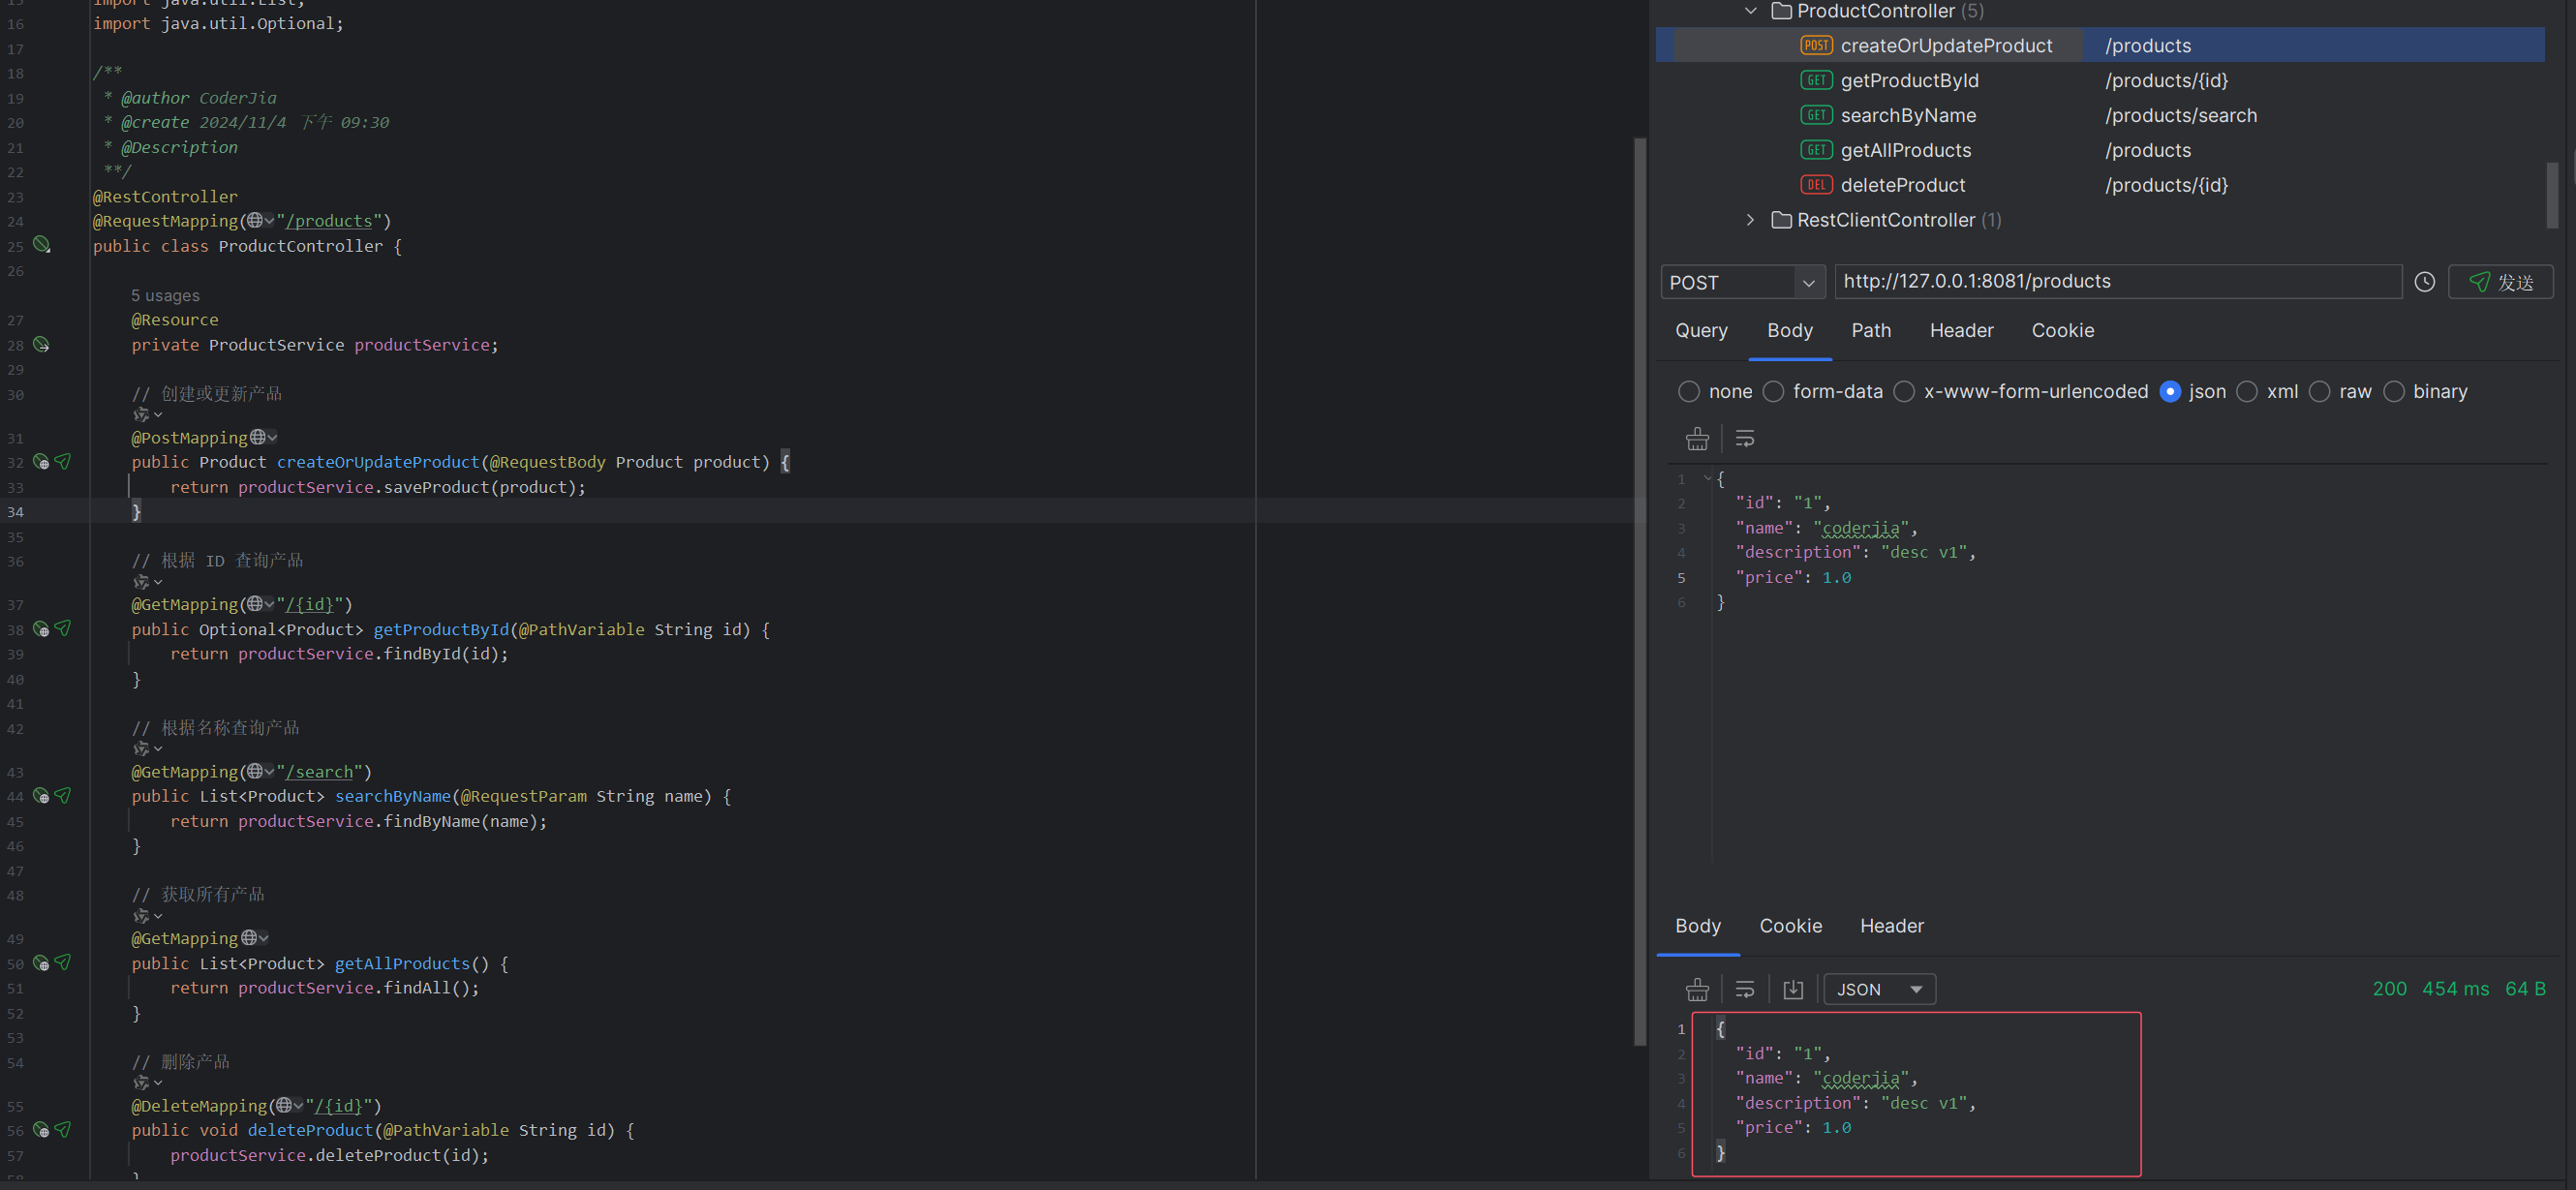
创建产品:
POST http://localhost:8080/products
Content-Type: application/json{"id": "1","name": "coderjia","description": "desc v1","price": 1.0
}
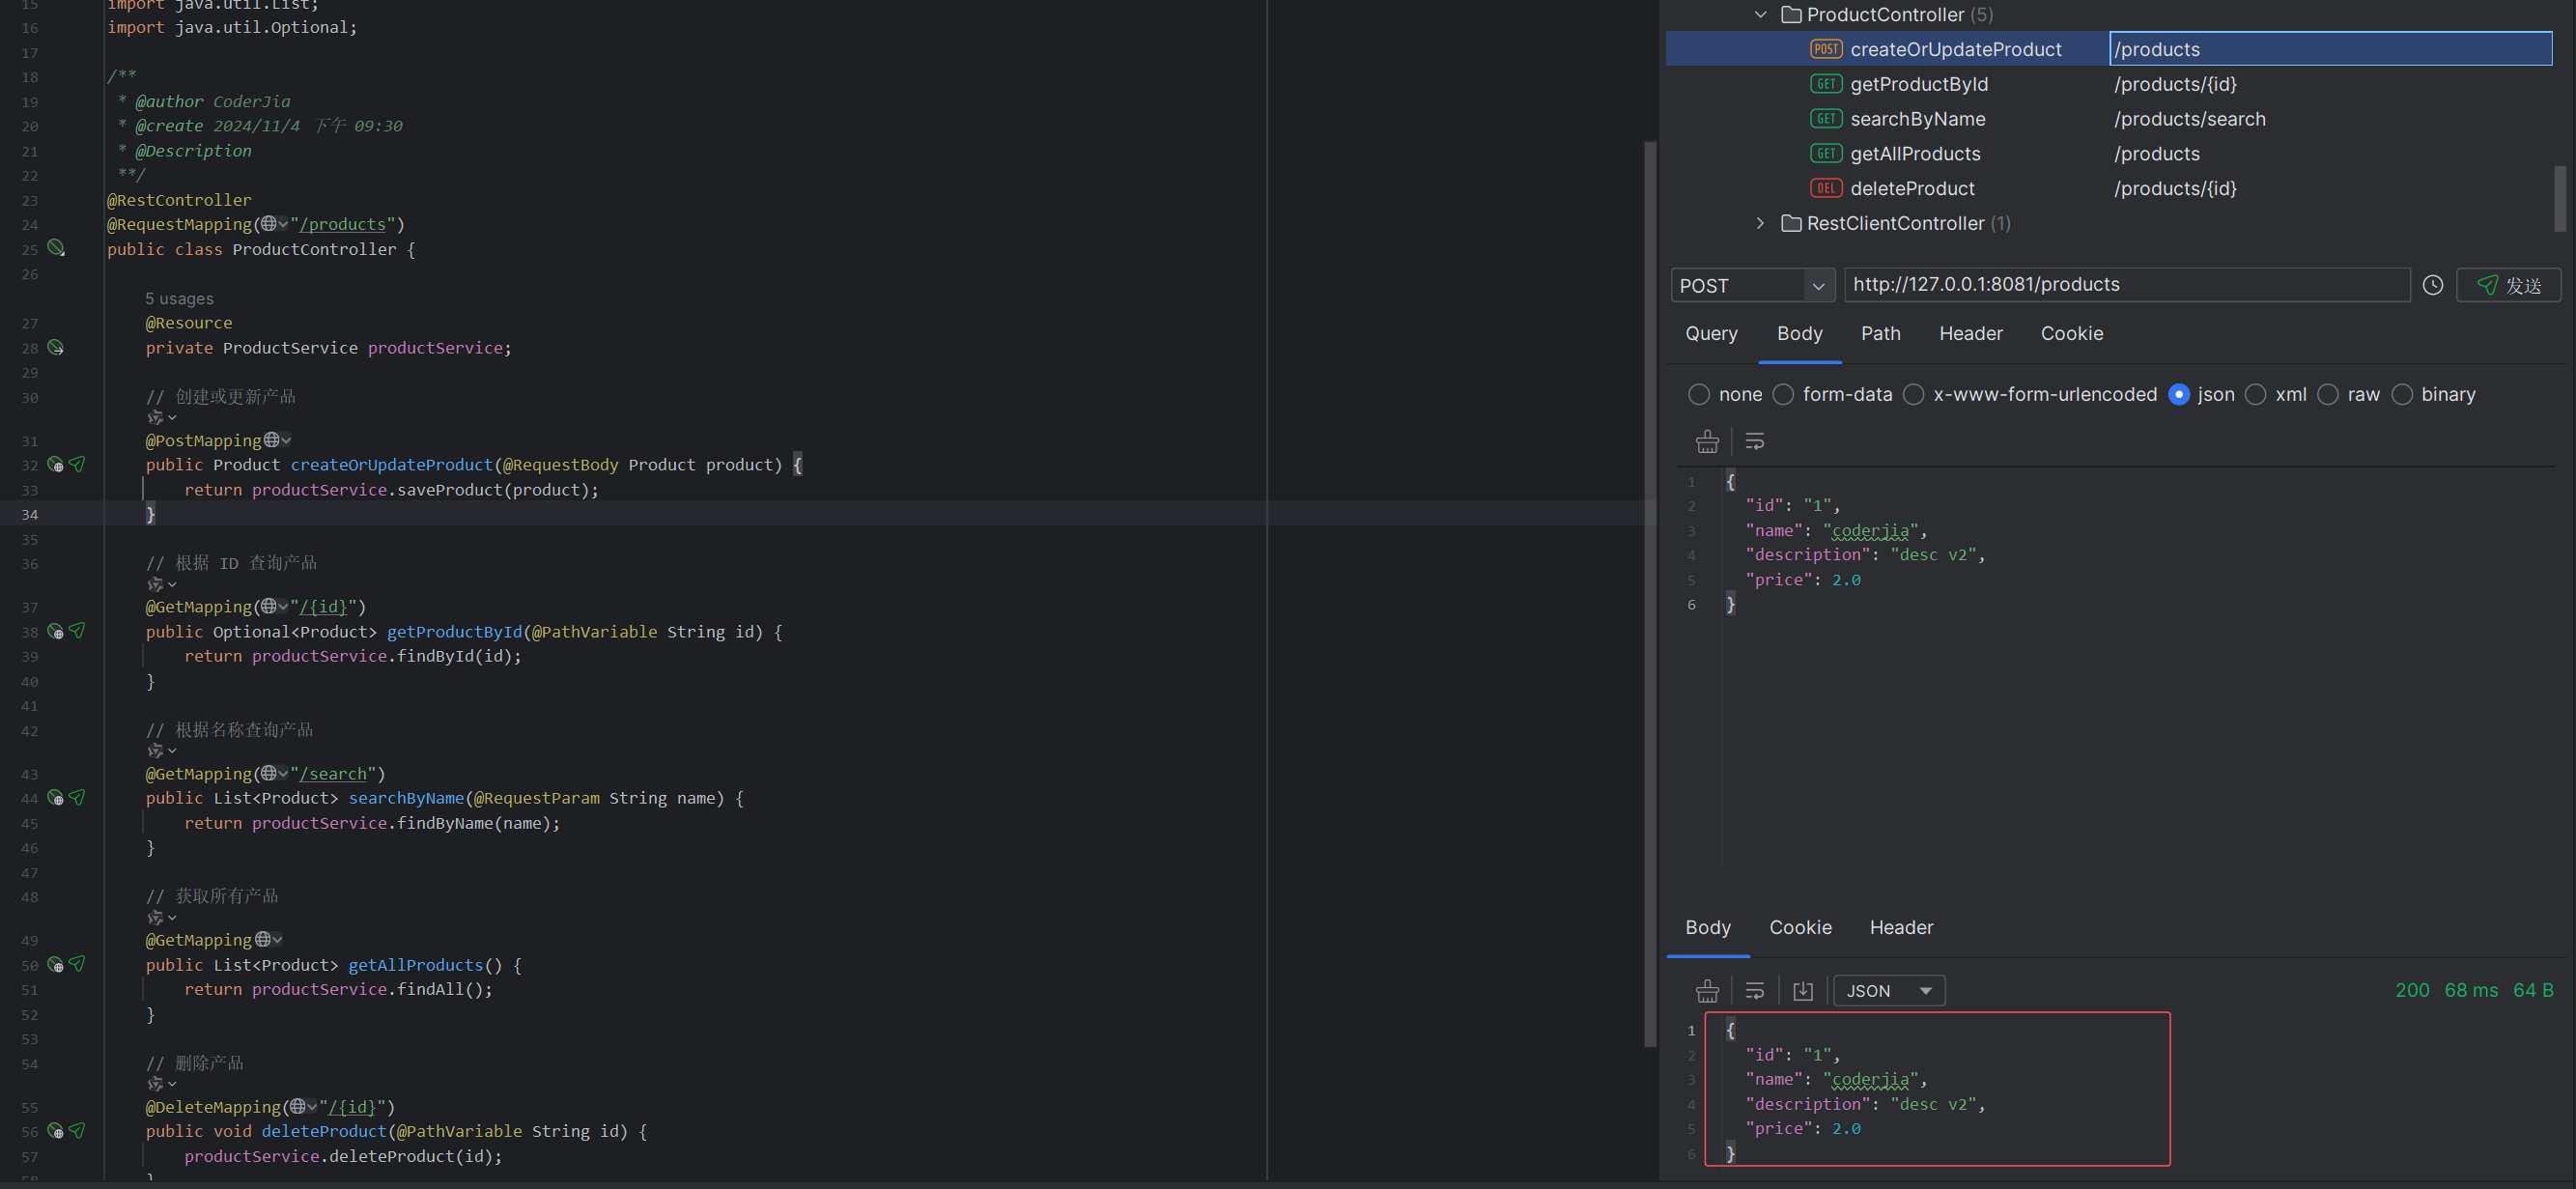
更新产品:
POST http://localhost:8080/products
Content-Type: application/json{"id": "1","name": "coderjia","description": "desc v2","price": 2.0
}
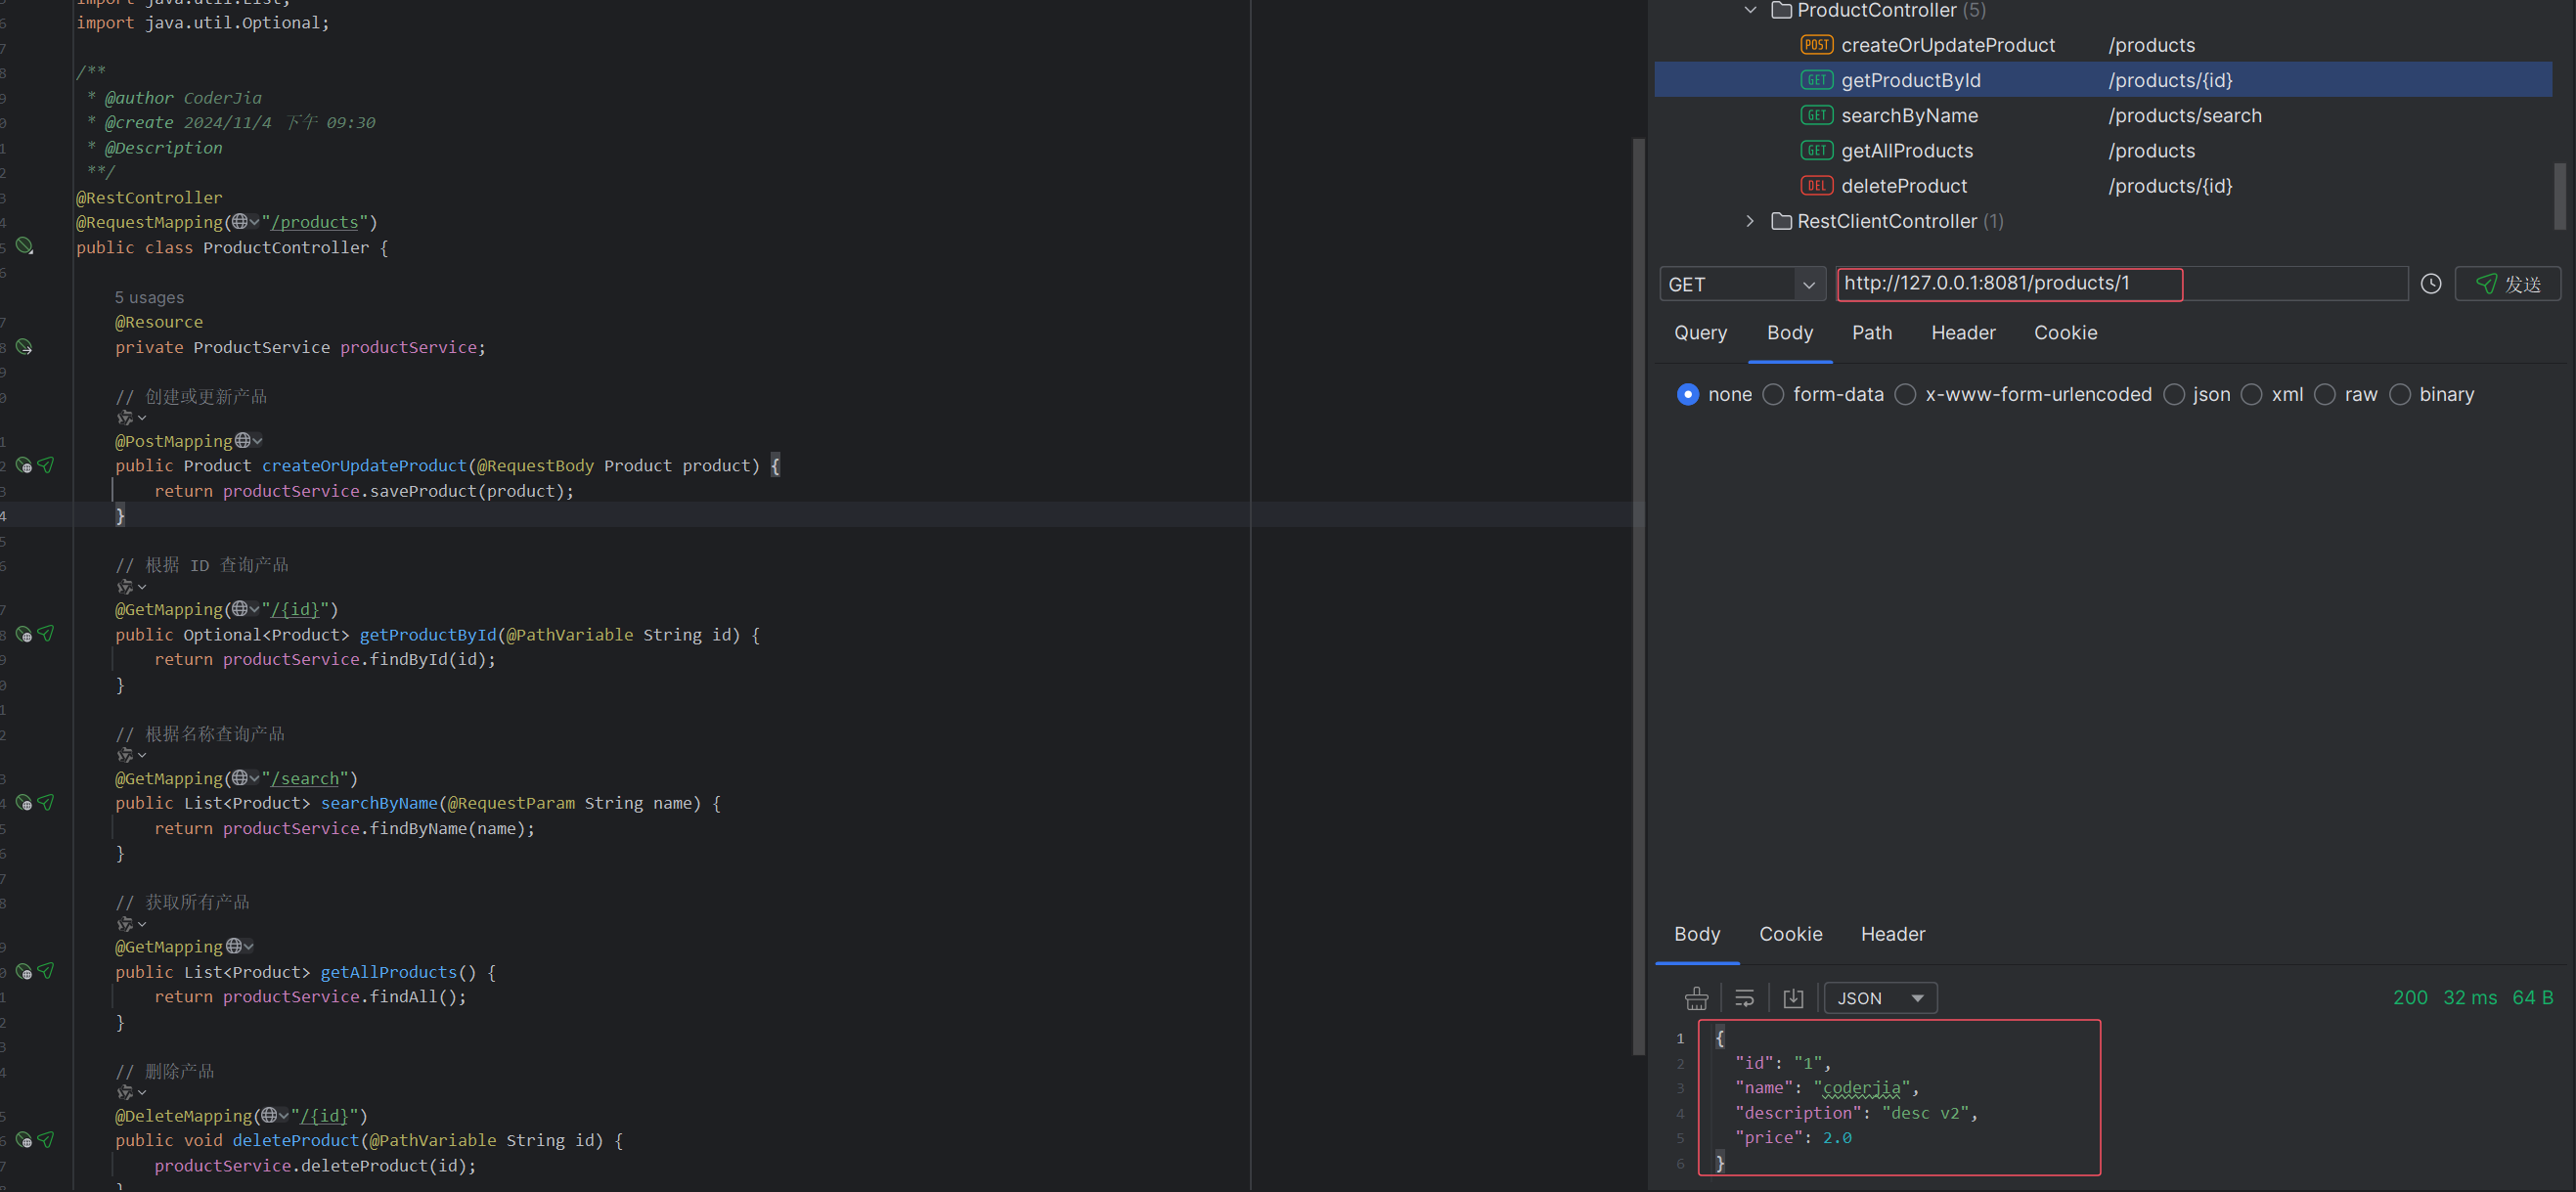
根据 ID 查询产品:
GET http://localhost:8080/products/1
根据名称查询产品:
GET http://localhost:8080/products/search?name=coderjia

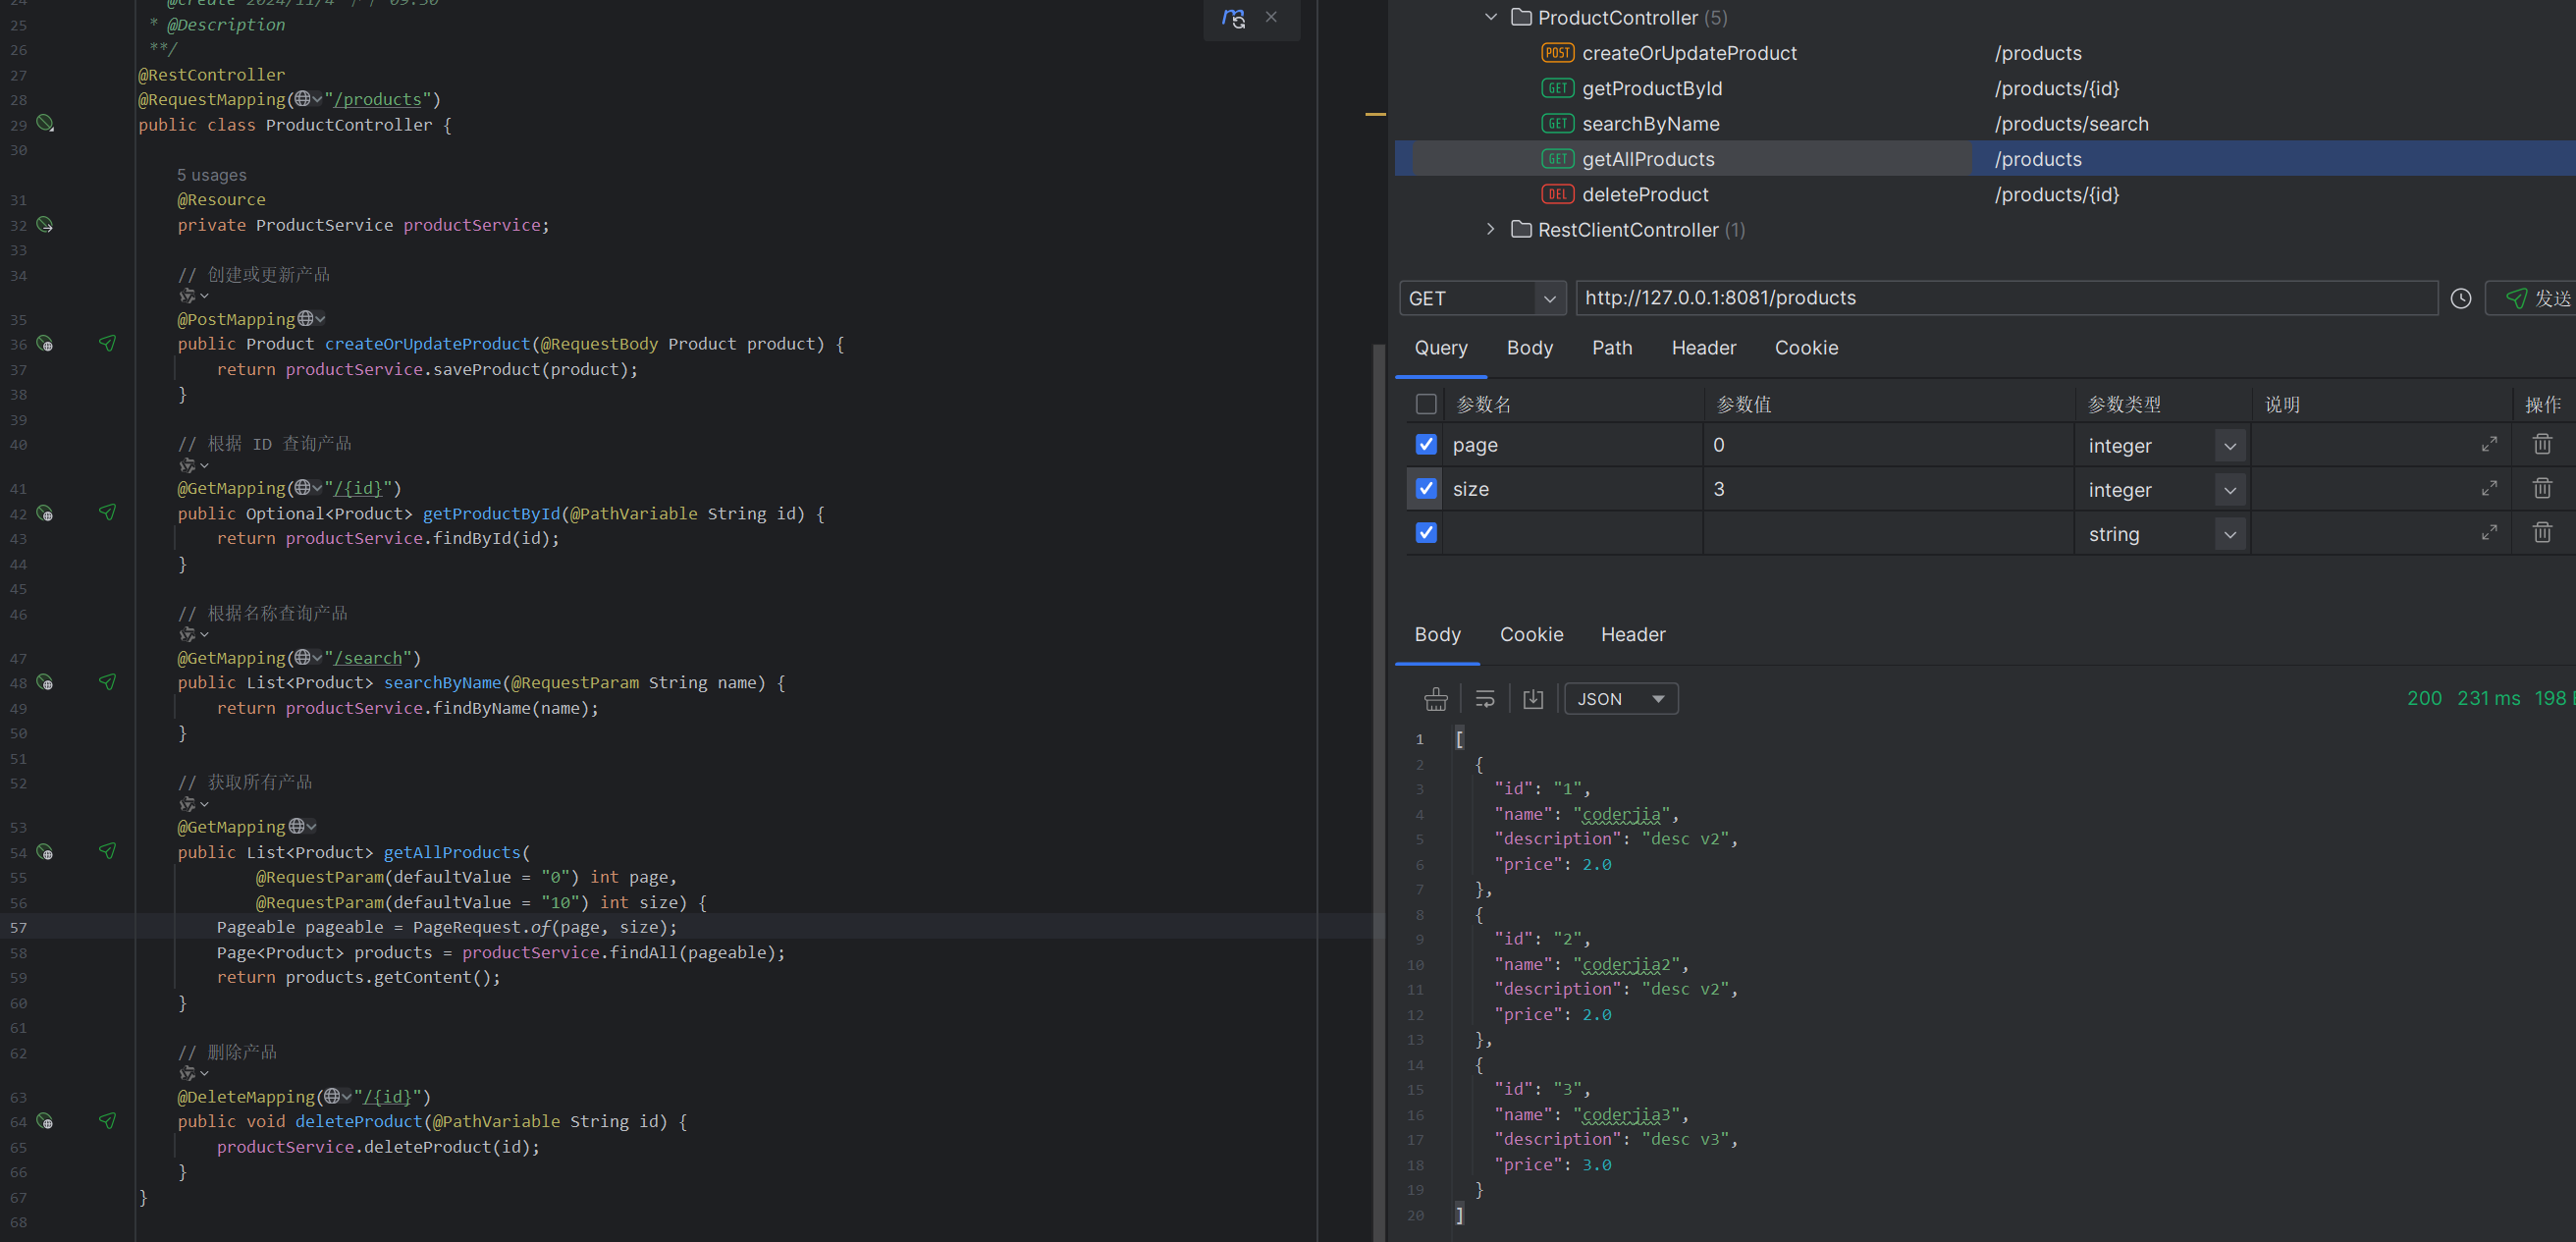
获取所有产品(分页):
GET http://localhost:8080/products?page=0&size=3
删除产品:
DELETE http://localhost:8080/products/1

4. 总结
通过以上步骤,我们构建了一个完整的 Spring Boot 3 和 Elasticsearch 8.x 的增删改查示例应用。使用 Spring Data Elasticsearch Repository,我们能够快速实现对 Elasticsearch 的基本 CRUD 操作,简化了开发流程。希望这个示例能够帮助你理解如何在项目中有效使用 Elasticsearch!