可操作的见解
- 对于大型数据结构和高频操作,使用零拷贝反序列化
- 使用 nostd_entrypoint 代替 solana_program 的臃肿入口点
- 最小化动态分配,优先使用基于栈的数据结构
- 实现自定义序列化/反序列化以避免 Borsh 的开销
- 用 #[inline(always)] 标记关键函数以获得潜在的性能提升
- 使用位操作进行高效的指令解析
- 使用 Solana 特定的 C 系统调用,如 sol_invoke_signed_c
- 测量计算单元的使用情况以指导优化工作
介绍
Solana 开发者在编写程序时面临多个决策:如何平衡易用性、性能和安全性。这个范围从用户友好的 Anchor 框架,它在简化开发的同时带来一些开销,到使用不安全的 Rust 和直接系统调用的低级方法。虽然后者提供了最佳性能,但也带来了更高的复杂性和潜在的安全风险。开发者的关键问题不仅是如何优化,而是何时以及在多大程度上进行优化。
这篇博客文章深入探讨了这些选项,为开发者提供了一条导航优化领域的路线图。我们将考察以下抽象层次:
1. Anchor:大多数开发者的首选主观、强大、高级框架
2. 使用 零拷贝 的 Anchor:为大型数据结构优化的 Anchor 代码
3. 原生 Rust:纯 Rust 以平衡控制和易用性
4. Unasfe Rust 及直接 系统调用 (syscalls):推动性能的极限
目标不是规定一种适合所有人的解决方案,而是为开发者提供知识,以便根据特定用例做出明智的决策。
在这篇文章结束时,你将更好地理解如何思考这些不同的抽象层次,以及何时考虑走上优化之路。请记住,最优化的代码并不总是最佳解决方案——关键在于为你的项目需求找到合适的平衡。
对于急于了解的读者:

简化的框架权衡图
计算单元
Solana 的高性能架构依赖于高效的资源管理。该系统的核心是计算单元 (CUs)——这是验证者处理给定交易所消耗的计算资源的度量。
为什么要关心计算单元?
1. 交易成功: 每个交易都有一个 CU 限制。超出限制会导致交易失败
2. 成本效率: 较低的 CU 使用意味着较低的交易费用
3. 用户体验: 优化的程序执行更快,提升整体用户体验
4. 可扩展性: 高效的程序允许每个区块处理更多交易,提高网络吞吐量
测量计算单元
solana_program::log::sol_log_compute_units() 系统调用在程序执行的特定点记录程序消耗的计算单元数量。
以下是使用该系统调用的简单 compute_fn! 宏实现:
#[macro_export]macro_rules! compute_fn {($msg:expr=> $($tt:tt)*) => {::solana_program::msg!(concat!($msg, " {"));::solana_program::log::sol_log_compute_units();let res = { $($tt)* };::solana_program::log::sol_log_compute_units();::solana_program::msg!(concat!(" } // ", $msg));res};}
这段宏代码来自 Solana Developers GitHub 仓库,用于 CU 优化。该代码片段实现了一个具有两个指令 initialize 和 increment 的计数器程序。
在本文中,我们将用四种不同的方式编写相同的计数器程序,包含相同的两个指令 initialize 和 increment,并比较它们的 CU 使用情况:Anchor、使用零拷贝反序列化的 Anchor、原生 Rust 和不安全 Rust。
初始化一个账户并对该账户进行小的更改(在这种情况下是递增)是比较这些不同方法的一个不错的基准。我们暂时不使用 PDA。
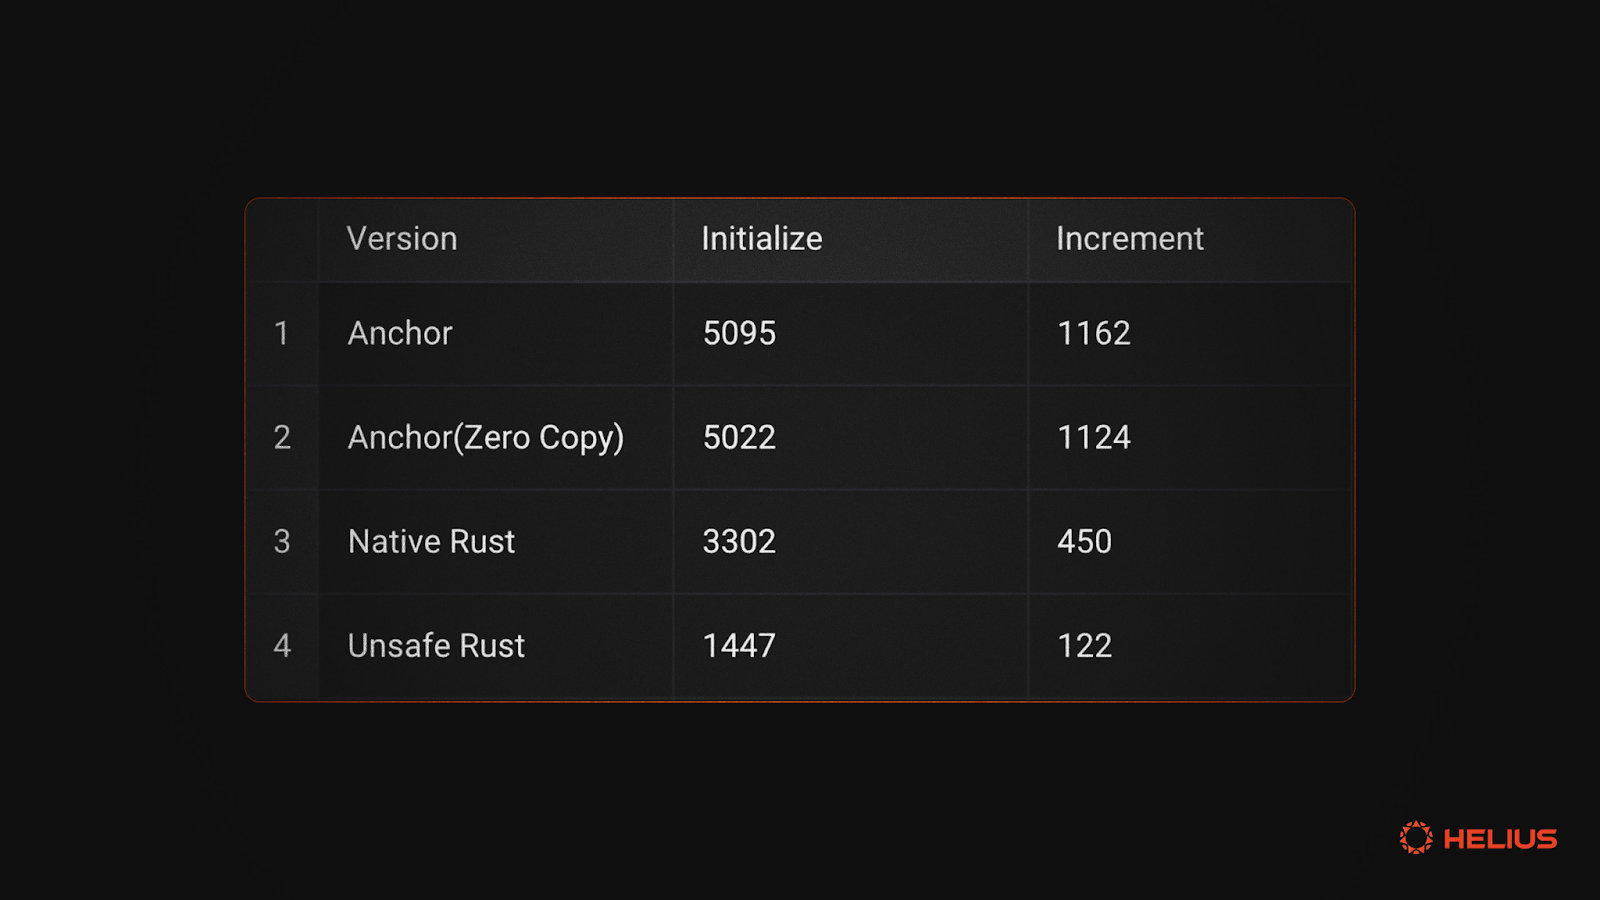
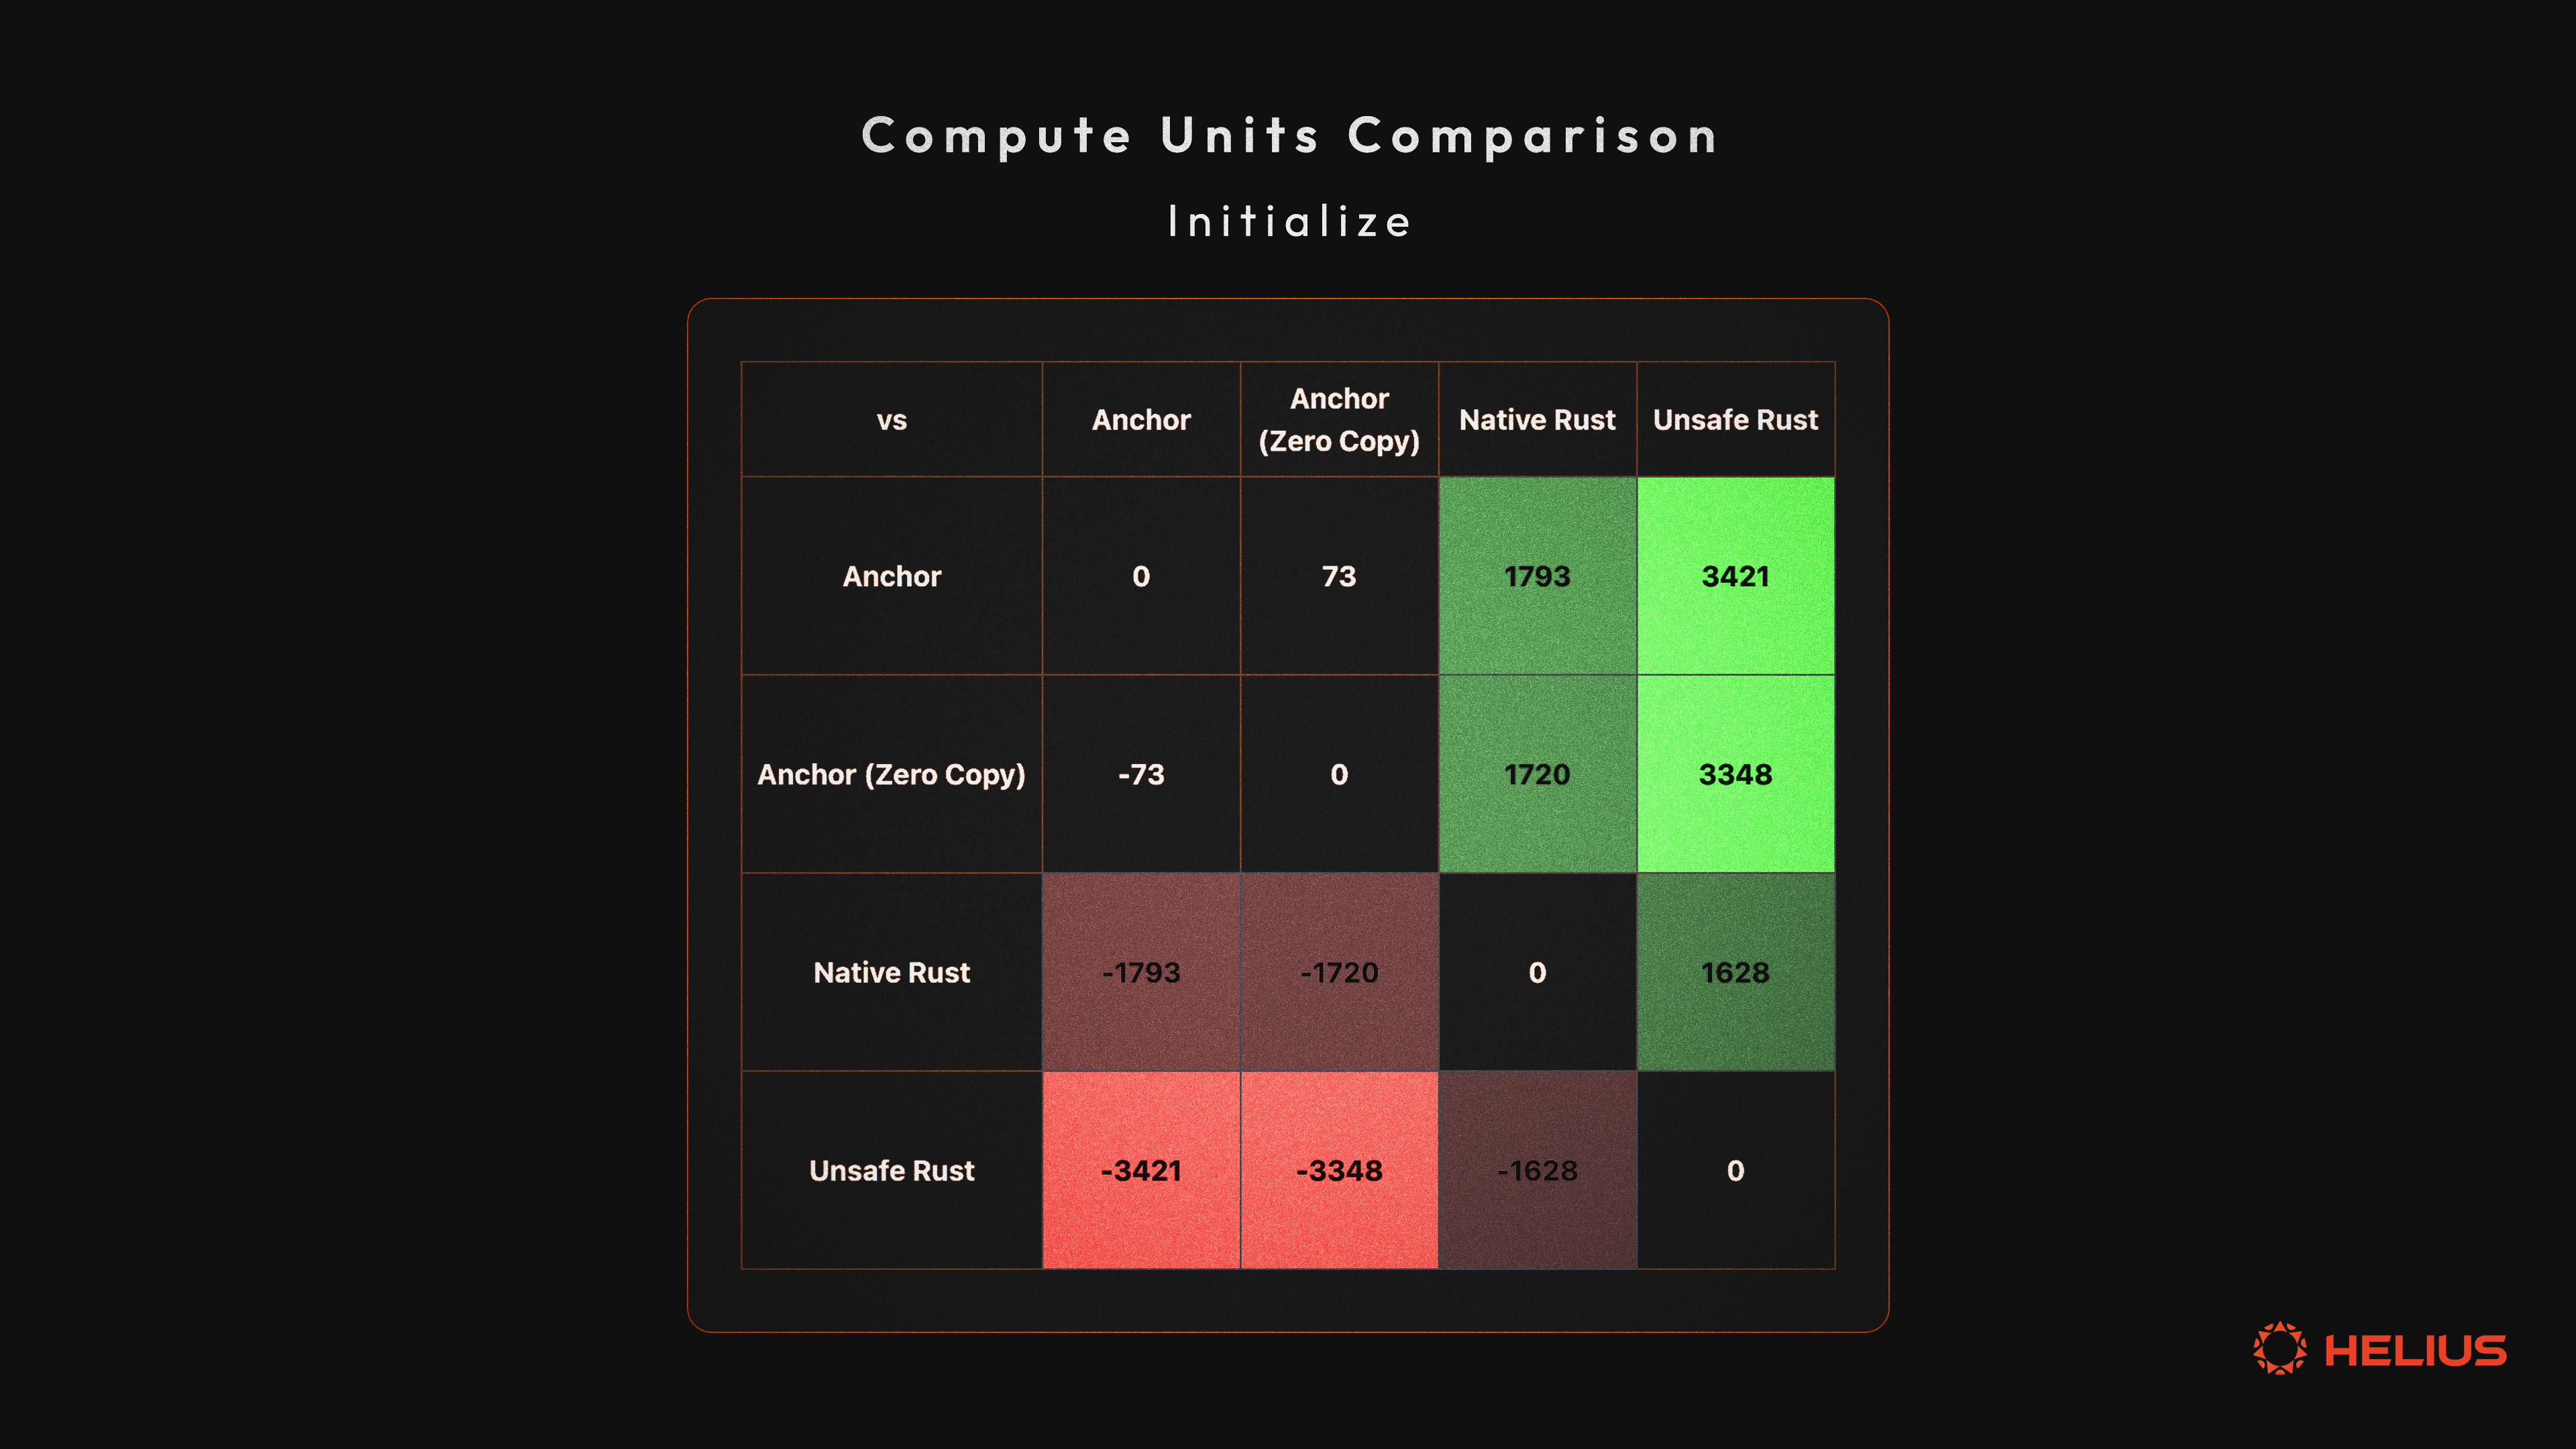
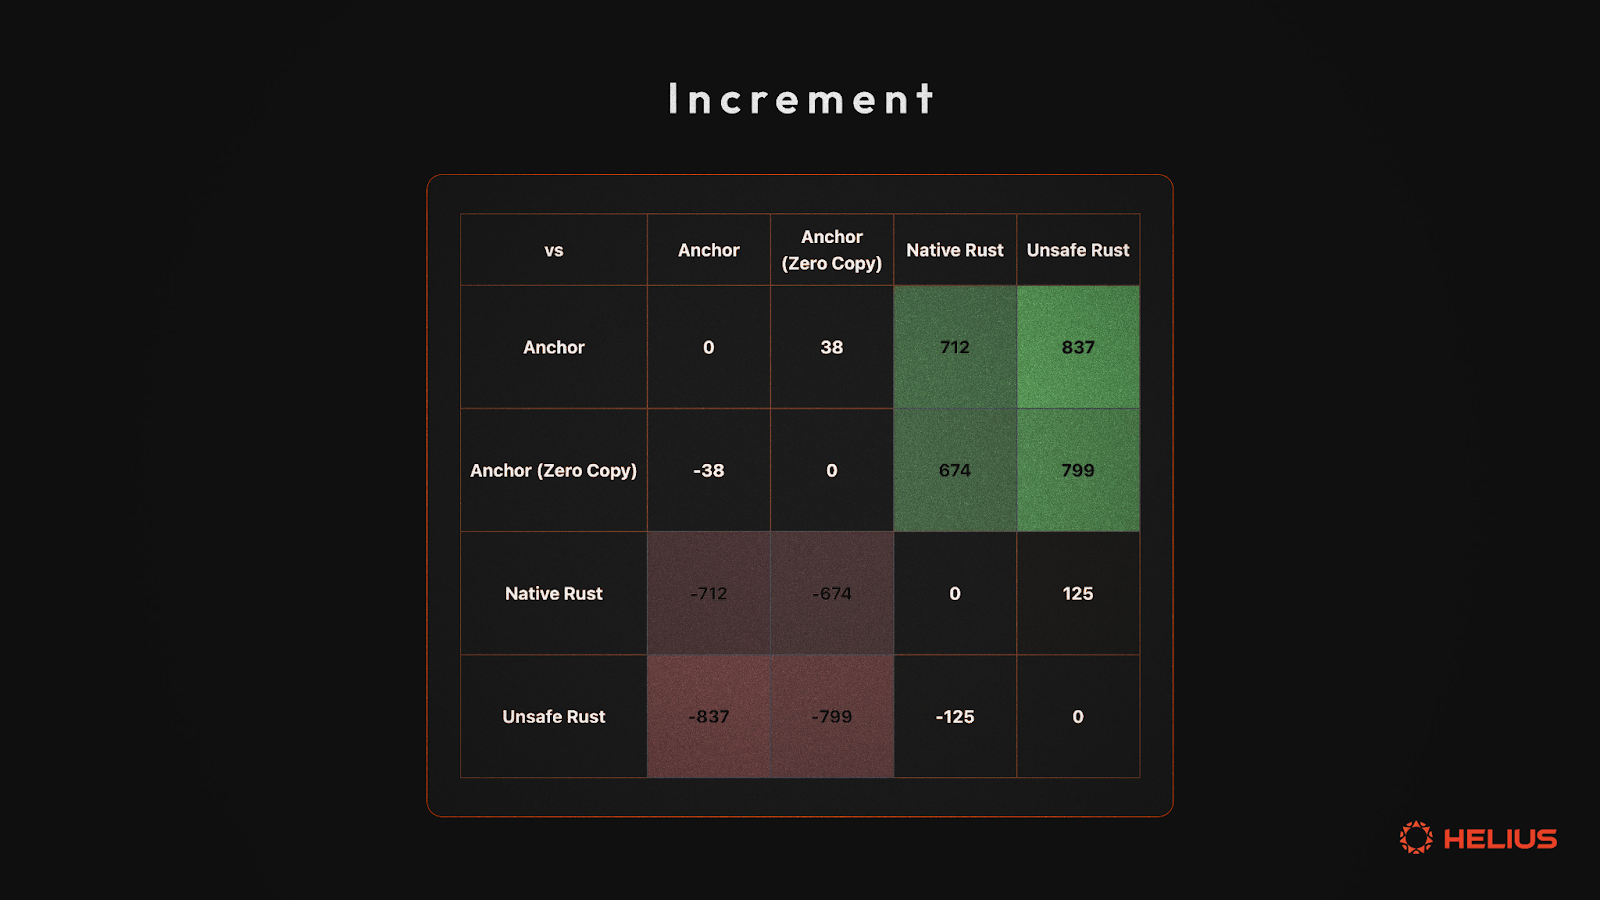
对于急于了解的读者,以下是四种方法的 CU 比较:

CU 比较

初始化指令

递增指令
让我们开始吧…
零拷贝反序列化
零拷贝反序列化允许我们直接解释账户数据,而无需分配新内存或复制数据。这种技术可以减少 CPU 使用,降低内存消耗,并可能导致更高效的指令。
让我们从一个基本的 Anchor 计数器程序开始:
    use anchor_lang::prelude::*;declare_id!("37oUa3WkeqwnFxSCqyMnpC3CfTSwtvyJxnwYQc3u6U7C");#[program]pub mod counter {use super::*;pub fn initialize(ctx: Context<Initialize>) -> Result<()> {let counter = &mut ctx.accounts.counter;counter.count = 0;Ok(())}pub fn increment(ctx: Context<Update>) -> Result<()> {let counter = &mut ctx.accounts.counter;//不进行 checked_add、wrapping add 或任何溢出检查//以保持简单counter.count += 1;Ok(())}}#[derive(Accounts)]pub struct Initialize<'info> {#[account(init, payer = user, space = 8 + 8)]pub counter: Account<'info, Counter>,#[account(mut)]pub user: Signer<'info>,pub system_program: Program<'info, System>,}#[derive(Accounts)]
pub struct Update<'info> {#[account(mut)]pub counter: Account<'info, Counter>,pub user: Signer<'info>,
}#[account]
pub struct Counter {pub count: u64,
}
上面的代码很简单。现在让我们用 zero_copy 来优化它:
use anchor_lang::prelude::*;declare_id!("7YkAh5yHbLK4uZSxjGYPsG14VUuDD6RQbK6k4k3Ji62g");#[program]
pub mod counter {use super::*;pub fn initialize(ctx: Context<Initialize>) -> Result<()> {let mut counter = ctx.accounts.counter.load_init()?;counter.count = 0;Ok(())}pub fn increment(ctx: Context<Update>) -> Result<()> {let mut counter = ctx.accounts.counter.load_mut()?;counter.count += 1;Ok(())}
}#[derive(Accounts)]
pub struct Initialize<'info> {#[account(init, payer = user, space = 8 + std::mem::size_of::<CounterData>())]pub counter: AccountLoader<'info, CounterData>,#[account(mut)]pub user: Signer<'info>,pub system_program: Program<'info, System>,
}#[derive(Accounts)]
pub struct Update<'info> {#[account(mut)]pub counter: AccountLoader<'info, CounterData>,pub user: Signer<'info>,
}#[account(zero_copy)]
pub struct CounterData {pub count: u64,
}
关键变化:
1. **使用 AccountLoader 代替 Account **
我们现在使用 AccountLoader<'info, CounterData> 代替 Account<'info, Counter>。这允许对账户数据进行零拷贝访问。
2. 零拷贝属性
在 CounterData 上的 #[account(zero_copy)] 属性表示该结构可以直接从内存中的原始字节进行解释。
3. 直接数据访问
在 initialize 和 increment 函数中,我们分别使用 load_init() 和 load_mut() 来获取对账户数据的可变访问,而无需复制它。
4. 减少重复账户漏洞
零拷贝反序列化解决了 Borsh 序列化中存在的潜在漏洞。使用 Borsh,会创建账户的不同副本并进行修改,然后再复制回同一地址。如果在一个交易中多次包含同一账户,这个过程可能导致不一致。然而,零拷贝直接从同一内存地址读取和写入。这种方法确保了交易中对账户的所有引用都在同一数据上操作,消除了由于重复账户导致的不一致风险。
**5. 内存布局保证
**零拷贝属性确保 CounterData 具有一致的内存布局,允许安全地从原始字节重新解释。这种实现将 initialize 指令的 CU 使用量从 5095 降低到 5022,将 increment 指令的 CU 使用量从 1162 降低到 1124。
在我们的案例中,零拷贝带来了微不足道的改进。然而,在处理大型数据结构时,零拷贝反序列化可能会非常有用。这是因为它可以在处理存储复杂或大量数据的账户时显著减少 CPU 和内存使用。
权衡与考虑
零拷贝并非没有挑战:
1. 增加复杂性: 代码变得稍微复杂,需要仔细处理原始数据。
2. 兼容性: 并非所有数据结构都适合零拷贝反序列化——它们必须具有可预测的内存布局。例如,具有动态大小字段的结构,如 Vec 或 String,与零拷贝反序列化不兼容。
使用零拷贝应基于你的具体用例。对于像我们的计数器这样的简单程序,收益可能微乎其微。然而,随着程序复杂性的增加和处理更大数据结构的需求,零拷贝可以成为优化的强大工具。
虽然零拷贝优化没有为我们的简单计数器程序带来显著改进,但对效率的追求并未就此结束。让我们探索另一条途径:在没有 Anchor 框架的情况下用 Rust 编写原生 Solana 程序。这种方法提供了更多的控制和优化潜力,尽管复杂性增加。
原生实现
原生 Rust 程序提供了更低级的接口,要求开发者处理 Anchor 自动化的各种任务。这包括账户反序列化、序列化和各种安全检查。虽然这对开发者的要求更高,但也为精细优化提供了机会。
让我们看看我们计数器程序的原生 Rust 实现:
use solana_program::{account_info::{next_account_info, AccountInfo},entrypoint,entrypoint::ProgramResult,program_error::ProgramError,pubkey::Pubkey,rent::Rent,system_instruction,program::invoke,sysvar::Sysvar,
};
use std::mem::size_of;// 定义状态结构
struct Counter {count: u64,
}// 声明并导出程序的入口点
entrypoint!(process_instruction);// 程序入口点的实现
pub fn process_instruction(program_id: &Pubkey,accounts: &[AccountInfo],instruction_data: &[u8],
) -> ProgramResult {let instruction = instruction_data.get(0).ok_or(ProgramError::InvalidInstructionData)?;match instruction {0 => initialize(program_id, accounts),1 => increment(accounts),_ => Err(ProgramError::InvalidInstructionData),}
}fn initialize(program_id: &Pubkey, accounts: &[AccountInfo]) -> ProgramResult {let account_info_iter = &mut accounts.iter();let counter_account = next_account_info(account_info_iter)?;let user = next_account_info(account_info_iter)?;let system_program = next_account_info(account_info_iter)?;if !user.is_signer {return Err(ProgramError::MissingRequiredSignature);}if counter_account.owner != program_id {let rent = Rent::get()?;let space = size_of::<Counter>();let rent_lamports = rent.minimum_balance(space);invoke(&system_instruction::create_account(user.key,counter_account.key,rent_lamports,space as u64,program_id,),&[user.clone(), counter_account.clone(), system_program.clone()],)?;}let mut counter_data = Counter { count: 0 };counter_data.serialize(&mut &mut counter_account.data.borrow_mut()[..])?;Ok(())
}fn increment(accounts: &[AccountInfo]) -> ProgramResult {let account_info_iter = &mut accounts.iter();let counter_account = next_account_info(account_info_iter)?;let user = next_account_info(account_info_iter)?;if !user.is_signer {return Err(ProgramError::MissingRequiredSignature);}let mut counter_data = Counter::deserialize(&counter_account.data.borrow())?;// 为了保持简单,不进行 checked_add、wrapping add 或任何溢出检查counter_data.count += 1;counter_data.serialize(&mut &mut counter_account.data.borrow_mut()[..])?;Ok(())}impl Counter {fn serialize(&self, data: &mut [u8]) -> ProgramResult {if data.len() < size_of::<Self>() {return Err(ProgramError::AccountDataTooSmall);}//前 8 个字节是计数data[..8].copy_from_slice(&self.count.to_le_bytes());Ok(())}fn deserialize(data: &[u8]) -> Result<Self, ProgramError> {if data.len() < size_of::<Self>() {return Err(ProgramError::AccountDataTooSmall);}//前 8 个字节是计数let count = u64::from_le_bytes(data[..8].try_into().unwrap());Ok(Self { count })}}
关键区别和考虑事项:
- 手动指令解析与 Anchor 自动路由指令不同,我们手动解析指令数据并将其路由到适当的函数
let instruction = instruction_data.get(0).ok_or(ProgramError::InvalidInstructionData)?;match instruction {0 => initialize(program_id, accounts),1 => increment(accounts),_ => Err(ProgramError::InvalidInstructionData),}
2. 账户管理我们使用 next_account_info 来迭代账户,手动检查签名者和所有者。Anchor 使用其 #[derive(Accounts)] 宏自动处理此操作
let account_info_iter = &mut accounts.iter();let counter_account = next_account_info(account_info_iter)?;let user = next_account_info(account_info_iter)?;if !user.is_signer {return Err(ProgramError::MissingRequiredSignature);}
3. 自定义序列化: 我们为 Counter 结构体实现自定义 serialize 和 deserialize 方法。Anchor 默认使用 Borsh 序列化,将其抽象化
impl Counter {fn serialize(&self, data: &mut [u8]) -> ProgramResult {if data.len() < size_of::<Self>() {return Err(ProgramError::AccountDataTooSmall);}//前 8 个字节是计数data[..8].copy_from_slice(&self.count.to_le_bytes());Ok(())}fn deserialize(data: &[u8]) -> Result<Self, ProgramError> {if data.len() < size_of::<Self>() {return Err(ProgramError::AccountDataTooSmall);}//前 8 个字节是计数let count = u64::from_le_bytes(data[..8].try_into().unwrap());Ok(Self { count })}}
**4. 系统程序交互
**创建账户涉及直接与 系统程序 交互,使用 invoke 并进行 跨程序调用 (CPI),而 Anchor 通过其 init 约束简化了这一过程:
invoke(&system_instruction::create_account(user.key,counter_account.key,rent_lamports,space as u64,program_id,),&[user.clone(), counter_account.clone(), system_program.clone()],)?;
**5. 细粒度控制
**一般来说,原生程序提供了对数据布局和处理的更多控制,因为它们不遵循单一的、主观的框架,从而允许更优化的代码。
如何看待 Anchor 与原生的区别?
1. 显式与隐式 原生程序需要显式处理许多 Anchor 隐式管理的方面。这包括账户验证、序列化和指令路由
2. 安全考虑 没有 Anchor 的内置检查,开发者必须警惕实施 适当的安全措施,例如检查账户所有权和签名者状态
3. 性能调优 原生程序允许更细粒度的性能优化,但需要对 Solana 的运行时行为有更深入的理解
4. 样板代码 预计需要为 Anchor 抽象掉的常见操作编写更多样板代码
5. 学习曲线 虽然可能更高效,但原生编程的学习曲线更陡峭,需要对 Solana 的架构有更深入的了解
总结
从 Anchor 转向原生的最大限制因素是处理序列化和反序列化。在我们的案例中,这相对简单。但随着状态管理变得更加复杂,这将变得越来越复杂。
然而,Anchor 使用的 Borsh 在计算上是非常昂贵的,因此付出努力是值得的。
我们的优化之旅并未就此结束。在下一部分中,我们将通过利用直接系统调用并避免 Rust 标准库进一步推动边界。
这种方法具有挑战性,但我保证它将提供一些关于 Solana 运行时内部工作原理的有趣见解。
通过不安全的 Rust 和直接系统调用推动极限
为了将我们的计数器程序的性能推向极限,我们现在将探索使用不安全的 Rust 和直接系统调用。不安全的 Rust 允许开发者绕过标准安全检查,进行直接内存操作和低级优化。系统调用则提供了与 Solana 运行时的直接接口。这种方法虽然复杂且需要细致的开发,但可以带来显著的 CU 节省。然而,它也要求对 Solana 的架构有更深入的理解,并对程序安全给予细致关注。潜在的性能提升是巨大的,但也伴随着更大的责任。
让我们看看一个利用这些高级技术的高度优化版本的计数器程序:
use solana_nostd_entrypoint::{basic_panic_impl, entrypoint_nostd, noalloc_allocator,solana_program::{entrypoint::ProgramResult, log, program_error::ProgramError, pubkey::Pubkey, system_program,},InstructionC, NoStdAccountInfo,};entrypoint_nostd!(process_instruction, 32);pub const ID: Pubkey = solana_nostd_entrypoint::solana_program::pubkey!("EgB1zom79Ek4LkvJjafbkUMTwDK9sZQKEzNnrNFHpHHz");noalloc_allocator!();basic_panic_impl!();const ACCOUNT_DATA_LEN: usize = 8; // 8 字节用于 u64 计数器/** 程序入口点* ------------------* 入口点接收:* - program_id: 程序账户的公钥* - accounts: 指令所需的账户数组* - instruction_data: 包含指令数据的字节数组** 指令数据格式:* ------------------------* | 位 0 | 位 1-7 |* |-------|----------|* | 0/1 | 未使用 |* * 0: 初始化* 1: 增加*/#[inline(always)]pub fn process_instruction(_program_id: &Pubkey,accounts: &[NoStdAccountInfo],instruction_data: &[u8],) -> ProgramResult {if instruction_data.is_empty() {return Err(ProgramError::InvalidInstructionData);}
// 使用最低有效位来确定指令match instruction_data[0] & 1 {0 => initialize(accounts),1 => increment(accounts),_ => unreachable!(),}}/** 初始化函数* -------------------* 此函数初始化一个新的计数器账户。* * 账户结构:* ------------------* 1. 付款账户(签名者,可写)* 2. 计数器账户(可写)* 3. 系统程序** instruction_data 的内存布局:* -----------------------------------------* | 字节 | 内容 |* |----------|----------------------------|* | 0-3 | 指令鉴别器 |* | 4-11 | 所需 lamports (u64) |* | 12-19 | 空间 (u64) |* | 20-51 | 程序 ID |* | 52-55 | 未使用 |*/#[inline(always)]fn initialize(accounts: &[NoStdAccountInfo]) -> ProgramResult {let [payer, counter, system_program] = match accounts {[payer, counter, system_program, ..] => [payer, counter, system_program],_ => return Err(ProgramError::NotEnoughAccountKeys),};if counter.key() == &system_program::ID {return Err(ProgramError::InvalidAccountData);}let rent = solana_program::rent::Rent::default();let required_lamports = rent.minimum_balance(ACCOUNT_DATA_LEN);let mut instruction_data = [0u8; 56];instruction_data[4..12].copy_from_slice(&required_lamports.to_le_bytes());instruction_data[12..20].copy_from_slice(&(ACCOUNT_DATA_LEN as u64).to_le_bytes());instruction_data[20..52].copy_from_slice(ID.as_ref());let instruction_accounts = [payer.to_meta_c(),counter.to_meta_c(),];let instruction = InstructionC {program_id: &system_program::ID,accounts: instruction_accounts.as_ptr(),accounts_len: instruction_accounts.len() as u64,data: instruction_data.as_ptr(),data_len: instruction_data.len() as u64,};let infos = [payer.to_info_c(), counter.to_info_c()];// 调用系统程序以创建账户#[cfg(target_os = "solana")]unsafe {solana_program::syscalls::sol_invoke_signed_c(&instruction as *const InstructionC as *const u8,infos.as_ptr() as *const u8,infos.len() as u64,std::ptr::null(),0,);}// 将计数器初始化为 0let mut counter_data = counter.try_borrow_mut_data().ok_or(ProgramError::AccountBorrowFailed)?;counter_data[..8].copy_from_slice(&0u64.to_le_bytes());Ok(())}/** 增加函数* ------------------* 此函数增加计数器账户中的计数器。** 账户结构:* ------------------* 1. 计数器账户(可写)* 2. 付款账户(签名者)** 计数器账户数据布局:* ----------------------------* | 字节 | 内容 |* |-------|----------------|* | 0-7 | 计数器 (u64) |*/#[inline(always)]fn increment(accounts: &[NoStdAccountInfo]) -> ProgramResult {let [counter, payer] = match accounts {[counter, payer, ..] => [counter, payer],_ => return Err(ProgramError::NotEnoughAccountKeys),};if !payer.is_signer() || counter.owner() != &ID {return Err(ProgramError::IllegalOwner);}let mut counter_data = counter.try_borrow_mut_data().ok_or(ProgramError::AccountBorrowFailed)?;if counter_data.len() != 8 {return Err(ProgramError::UninitializedAccount);}let mut value = u64::from_le_bytes(counter_data[..8].try_into().unwrap());value += 1;counter_data[..8].copy_from_slice(&value.to_le_bytes());Ok(())}
关键区别和优化:
1. 无标准环境
我们使用 solana_nostd_entrypoint,它提供了一个无标准环境。这消除了 Rust 标准库的开销,减少了程序大小,并可能提高性能。感谢 cavemanloverboy 及其关于 Solana 程序的无标准入口点的 GitHub 仓库。
2. 内联函数
关键函数标记为 #[inline(always)]。内联是编译器优化的一种方式,其中函数的主体在调用位置插入,从而消除函数调用的开销。这可以导致更快的执行,特别是对于小型、频繁调用的函数。
3. 指令解析的位操作
我们使用 位操作 instruction_data[0] & 1 来确定指令类型,这比其他解析方法更高效:
// 使用最低有效位来确定指令match instruction_data[0] & 1 {0 => initialize(accounts),1 => increment(accounts),_ => unreachable!(),}
4. 零成本内存管理和最小化恐慌处理
noalloc_allocator! 和 basic_panic_impl! 宏实现了最小的、零开销的内存管理和恐慌处理:
Noalloc_allocator! 定义了一个自定义分配器,该分配器在任何分配尝试时都会恐慌,并在释放时不执行任何操作。将其设置为 Solana 程序的全局分配器有效地防止了运行时的任何动态内存分配:
#[macro_export]macro_rules! noalloc_allocator {() => {pub mod allocator {pub struct NoAlloc;extern crate alloc;unsafe impl alloc::alloc::GlobalAlloc for NoAlloc {#[inline]unsafe fn alloc(&self, _: core::alloc::Layout) -> *mut u8 {panic!("no_alloc :)");}#[inline]unsafe fn dealloc(&self, _: *mut u8, _: core::alloc::Layout) {}}#[cfg(target_os = "solana")]#[global_allocator]static A: NoAlloc = NoAlloc;}};}
这是至关重要的,因为:
a) 它消除了内存分配和释放操作的开销
b) 它强迫开发者使用基于栈或静态内存,这通常在性能上更快且更可预测
c) 它减少了程序的内存占用
basic_panic_impl! 提供了一个最小的恐慌处理程序,仅记录“panicked!”消息:
#[macro_export]
macro_rules! basic_panic_impl {() => {#[cfg(target_os = "solana")]#[no_mangle]fn custom_panic(_info: &core::panic::PanicInfo<'_>) {log::sol_log("panicked!");}};
}
5. 高效的 CPI 准备
InstructionC 结构,以及 to_meta_c 和 to_info_c 函数提供了一种低级、高效的方式来准备 CPI 数据:
let instruction_accounts = [payer.to_meta_c(),counter.to_meta_c(),];let instruction = InstructionC {program_id: &system_program::ID,accounts: instruction_accounts.as_ptr(),accounts_len: instruction_accounts.len() as u64,data: instruction_data.as_ptr(),data_len: instruction_data.len() as u64,
};let infos = [payer.to_info_c(), counter.to_info_c()
];
这些函数创建了与 C 兼容的结构,可以直接传递给 sol_invoke_signed_c 系统调用。通过避免 Rust 的高级抽象带来的开销,并直接使用原始指针和与 C 兼容的结构,这些函数最小化了为 CPI 准备的计算成本。这种方法通过减少内存分配、复制和转换,节省了 CUs,这些通常在使用更抽象的 Rust 类型时会发生。
例如,to_info_c 方法有效地使用 直接指针算术 构造了一个 AccountInfoC 结构:
pub fn to_info_c(&self) -> AccountInfoC {AccountInfoC {key: offset(self.inner, 8),lamports: offset(self.inner, 72),data_len: self.data_len() as u64,data: offset(self.inner, 88),owner: offset(self.inner, 40),// … 其他字段 …}
}
这种直接操作内存布局的方法允许极其高效地创建 CPI 所需的结构,从而降低这些操作的 CU 成本。
6. 直接系统调用和不安全 Rust
这种方法绕过了通常的 Rust 抽象,直接与 Solana 的运行时交互,提供了显著的性能优势。然而,它也引入了复杂性,并需要小心处理不安全的 Rust:
// 调用系统程序以创建账户
#[cfg(target_os = "solana")]
unsafe {solana_program::syscalls::sol_invoke_signed_c(&instruction as *const InstructionC as *const u8,infos.as_ptr() as *const u8,infos.len() as u64,std::ptr::null(),0,);
}
7. 条件编译:
#[cfg(target_os = “solana”)] 属性确保此代码仅在目标为 Solana 运行时时编译,因为这些系统调用仅在该环境中可用。
不安全 Rust 的潜在问题
虽然强大,但不安全的 Rust 如果处理不当可能会导致严重问题:
- 内存泄漏和损坏
- 未定义行为
- 竞争条件
不安全 Rust 的潜在问题
虽然强大,但不安全的 Rust 如果处理不当可能会导致严重问题:
- 未定义行为
- 竞争条件
为了降低使用不安全 Rust 的风险:
- 谨慎使用不安全块,仅在必要时使用
- 记录所有安全假设和不变条件
- 利用 Miri 和 Rust 内置的 sanitizers 进行测试
- 考虑对关键部分进行形式验证技术
- 进行针对不安全块的全面代码审查
总结
这篇文章探讨了 Solana 程序的各种优化级别,从高层的 Anchor 开发到低层的不安全 Rust 直接系统调用。我们看到每种方法在易用性、安全性和性能之间提供了不同的权衡。
关键要点:
- Anchor 提供了一个用户友好的框架,但有一些性能开销
- 零拷贝反序列化可以显著提高大型数据结构的效率
- 原生 Rust 提供了更多的控制和优化潜力
- 不安全 Rust 和直接系统调用提供了最大性能,但伴随更高的复杂性和风险
优化级别的选择取决于你的具体用例、性能要求和风险承受能力。始终测量优化的影响,并考虑你选择的长期维护影响。
如果你读到这里,感谢你!https://t.me/gtokentool 。


