6.6 本章练习
1)设计并实现完整的Restful风格的人员管理模块的Web API,版本号为V1,并配置产生Swagger接口文档。
答案:
1. 配置 Swagger 接口文档 创建一个 Swagger 配置类。
package com.example.demo.config;import io.swagger.v3.oas.models.Components;
import io.swagger.v3.oas.models.OpenAPI;
import io.swagger.v3.oas.models.info.Info;
import io.swagger.v3.oas.models.security.SecurityRequirement;
import io.swagger.v3.oas.models.security.SecurityScheme;
import org.springframework.context.annotation.Bean;
import org.springframework.context.annotation.Configuration;
import org.springframework.web.servlet.config.annotation.WebMvcConfigurer;@Configuration
public class Swagger2Config implements WebMvcConfigurer {@Beanpublic OpenAPI customOpenAPI() {return new OpenAPI().info(new Info().title("API Documentation").description("使用 Spring Boot 构建的 RESTful APIs").version("V1")).components(new Components().addSecuritySchemes("bearAuth",new SecurityScheme().name("Authorization").type(SecurityScheme.Type.HTTP).scheme("bear").bearerFormat("JWT"))).addSecurityItem(new SecurityRequirement().addList("bearAuth"));}}
2. 创建人员实体类 Person 实体类
package com.example.demo.bean;import javax.persistence.Entity;
import javax.persistence.GeneratedValue;
import javax.persistence.GenerationType;
import javax.persistence.Id;@Entity
public class Person {@Id@GeneratedValue(strategy = GenerationType.IDENTITY)private Long id;private String name;private Integer age;private String email;public Person() {}public Person(Long id, String name, Integer age, String email) {this.id = id;this.name = name;this.age = age;this.email = email;}public Long getId() {return id;}public void setId(Long id) {this.id = id;}public String getName() {return name;}public void setName(String name) {this.name = name;}public Integer getAge() {return age;}public void setAge(Integer age) {this.age = age;}public String getEmail() {return email;}public void setEmail(String email) {this.email = email;}
}
3. 创建人员控制器 接下来,创建一个控制器来处理 Web API 请求,遵循 RESTful 风格 PersonOneController
package com.example.demo.controller;import com.example.demo.bean.Person;
import io.swagger.v3.oas.annotations.Operation;
import io.swagger.v3.oas.annotations.responses.ApiResponse;
import io.swagger.v3.oas.annotations.responses.ApiResponses;
import org.springframework.http.HttpStatus;
import org.springframework.http.ResponseEntity;
import org.springframework.web.bind.annotation.*;
import java.util.ArrayList;
import java.util.List;@RestController
@RequestMapping("/api/v1/persons")
public class PersonOneController {List<Person> personList = new ArrayList<>();public PersonOneController() {personList.add(new Person(1L, "Alice", 12, "123@163.com"));personList.add(new Person(2L, "Bob", 12, "123@163.com"));}@Operation(summary = "Get all persons", description = "Retrieve all persons from the database.")@GetMappingpublic List<Person> getAllPersons() {return personList;}@Operation(summary = "Get person by ID", description = "Retrieve a person by their unique ID.")@ApiResponses(value = {@ApiResponse(responseCode = "200", description = "Found the person"),@ApiResponse(responseCode = "404", description = "Person not found")})@GetMapping("/{id}")public Person getPersonById(@PathVariable Long id) {int personIndex = getPersonIndexUsingPersonId(id);Person person = personList.get(personIndex);return person;}private Integer getPersonIndexUsingPersonId(Long personId){int personIndex = 0;for (Person personObj : personList) {if (personObj.getId() == personId) {personIndex = personList.indexOf(personObj);}}return personIndex;}@Operation(summary = "Create a new person", description = "Create a new person in the database.")@PostMappingpublic ResponseEntity<Person> createPerson(@RequestBody Person person) {personList.add(person);return new ResponseEntity<>(person, HttpStatus.CREATED);}@Operation(summary = "Update an existing person", description = "Update an existing person by ID.")@PutMapping("/{id}")public ResponseEntity<Person> updatePerson(@PathVariable Long id, @RequestBody Person person) {int personIndex = getPersonIndexUsingPersonId(id);personList.set(personIndex, person);return new ResponseEntity<>(person, HttpStatus.OK);}@Operation(summary = "Delete a person", description = "Delete a person by their unique ID.")@DeleteMapping("/{id}")public ResponseEntity<Void> deletePerson(@PathVariable Long id) {int personIndex = getPersonIndexUsingPersonId(id);personList.remove(id);return ResponseEntity.noContent().build();}}
4. 启动并测试 启动 Spring Boot 应用并访问 Swagger UI:
http://localhost:8080/swagger-ui.html
Swagger UI 页面会显示所有 API 的文档,您可以在该页面直接测试人员管理的增、删、改、查操作。
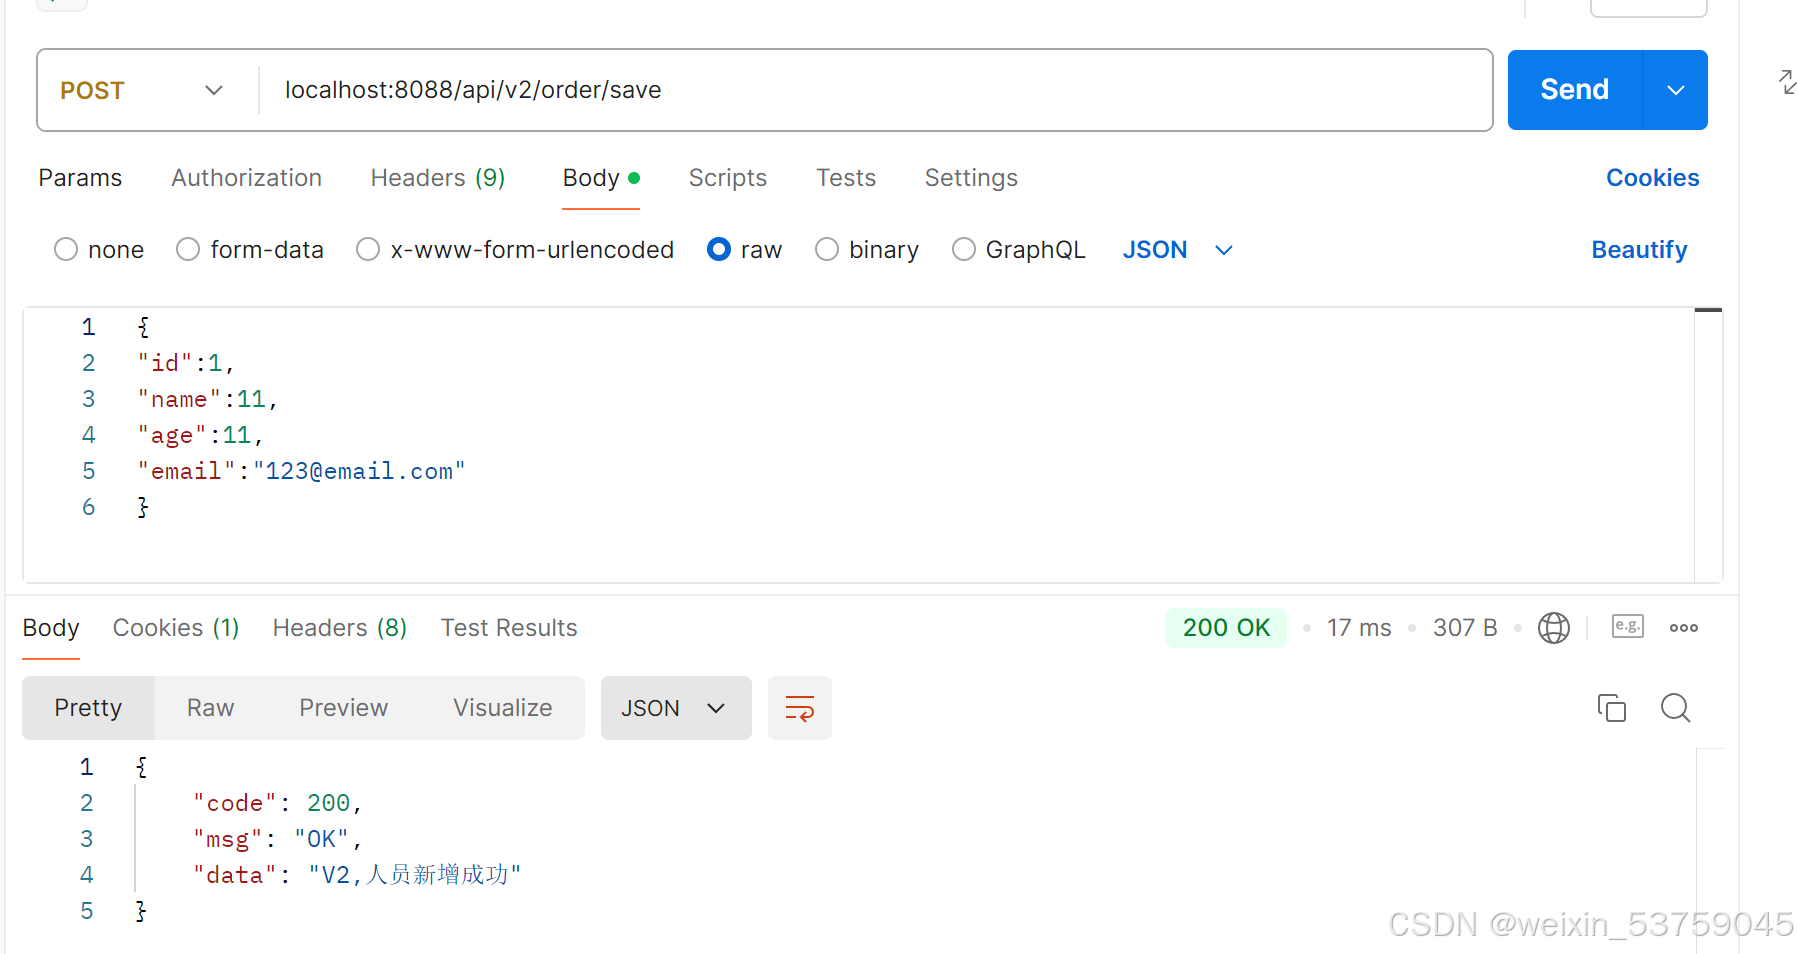
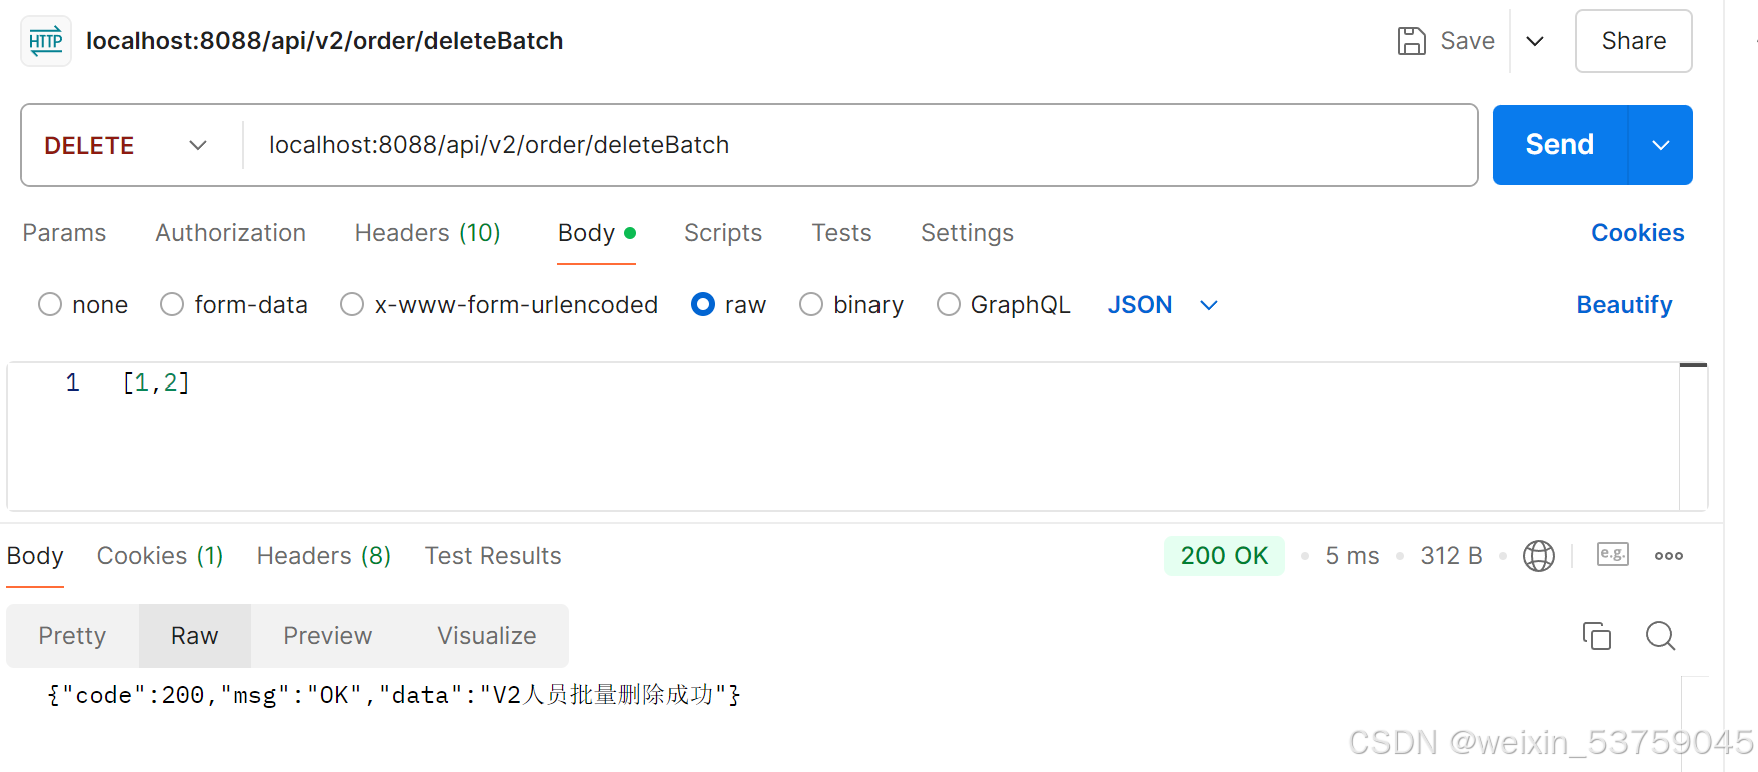
2)实现人员管理模块的Web API控制版本,接口新版本为V2,修改V2版本的人员新增接口,并增加人员批量删除接口。
答案:
Sprinng boot对Restful的支持非常全面,因而实现Restful API非常简单,同样对于API版本控制也有相应的实现方案:
1)创建自定义的@ApiVersion注解。
2)自定义URL匹配规则ApiVersionCondition。
3)使用RequestMappingHandlerMapping创建自定义的映射处理程序,根据Request参数匹配符合条件的处理程序。
下面通过示例程序来演示Web API如何增加版本号。
1. 创建自定义注解 创建一个自定义版本号标记注解@ApiVersion,实现代码如下:
package com.example.demo.apiversion;import java.lang.annotation.*;@Target({ElementType.TYPE})
@Retention(RetentionPolicy.RUNTIME)
@Documented
public @interface ApiVersion {int value() default 1;
}
在上面的示例中,创建了ApiVersion自定义注解用于API版本控制,并返回了对应的版本号。
2. 自定义URL匹配逻辑 接下来定义URL匹配逻辑,创建ApiVersionCondition类并继承RequestCondition接口,将提取请求URL中的版本号与注解上定义的版本号进行对比,以此来判断某个请求应落在哪个控制器上。实现代码如下:
package com.example.demo.apiversion;import org.springframework.web.servlet.mvc.condition.RequestCondition;import javax.servlet.http.HttpServletRequest;
import java.util.regex.Matcher;
import java.util.regex.Pattern;public class ApiVersionCondition implements RequestCondition<ApiVersionCondition> {private final static Pattern VERSION_PREFIX_PATTERN = Pattern.compile(".*v(\\d+).*");private int apiVersion;public ApiVersionCondition(int apiVersion) {this.apiVersion = apiVersion;}public int getApiVersion() {return apiVersion;}public void setApiVersion(int apiVersion) {this.apiVersion = apiVersion;}@Overridepublic ApiVersionCondition combine(ApiVersionCondition other) {return new ApiVersionCondition(other.getApiVersion());}@Overridepublic ApiVersionCondition getMatchingCondition(HttpServletRequest request) {Matcher m = VERSION_PREFIX_PATTERN.matcher(request.getRequestURI());if(m.find()){Integer version = Integer.parseInt(m.group(1));if(version >= this.apiVersion){return this;}}return null;}@Overridepublic int compareTo(ApiVersionCondition other, HttpServletRequest request) {return other.getApiVersion() - this.apiVersion;}
}
在上面的示例中,通过ApiVersionCondition类重写RequestCondition定义的URL匹配逻辑。
当方法级别和类级别都有ApiVersion注解时,通过ApiVersionRequestCondition.combine方法将两者进行合并。最终将提取请求URL中的版本号,与注解上定义的版本号进行比对,判断URL是否符合版本要求。
3. 自定义匹配的处理程序 接下来实现自定义匹配的处理程序。先创建ApiRequestMappingHandlerMapping类,重写部分RequestMappingHandlerMapping的方法,实现自定义的匹配处理程序 示例代码如下:
package com.example.demo.apiversion;import org.springframework.web.bind.annotation.RequestMapping;
import org.springframework.web.servlet.mvc.condition.RequestCondition;
import org.springframework.web.servlet.mvc.method.annotation.RequestMappingHandlerMapping;import java.lang.reflect.Method;public class ApiRequestMappingHandlerMapping extends RequestMappingHandlerMapping {private static final String VERSION_FLAG = "version";private static RequestCondition<ApiVersionCondition> createCondition(Class<?> clazz) {RequestMapping classRequestMapping = clazz.getAnnotation(RequestMapping.class);if (classRequestMapping == null) {return null;}StringBuilder mappingUrlBuilder = new StringBuilder();if(classRequestMapping.value().length > 0){mappingUrlBuilder.append(classRequestMapping.value()[0]);}String mappingUrl = mappingUrlBuilder.toString();if(!mappingUrl.contains(VERSION_FLAG)){return null;}ApiVersion apiVersion = clazz.getAnnotation(ApiVersion.class);return apiVersion == null? new ApiVersionCondition(1) : new ApiVersionCondition(apiVersion.value());}@Overrideprotected RequestCondition<?> getCustomMethodCondition(Method method) {return createCondition(method.getClass());}@Overrideprotected RequestCondition<?> getCustomTypeCondition(Class<?> handlerType) {return createCondition(handlerType);}
}
4. 配置注册自定义的RequestMappingHandlerMapping。 重写WebMvcRegistrationsConfig类,重写getRequestMappingHandlerMapping()的方法,将之前创建的ApiRequestMappingHandlerMapping注册到系统中。
package com.example.demo.apiversion;import org.springframework.boot.autoconfigure.web.servlet.WebMvcRegistrations;
import org.springframework.context.annotation.Configuration;
import org.springframework.web.servlet.mvc.method.annotation.RequestMappingHandlerMapping;@Configuration
public class WebMvcRegisterationsConfig implements WebMvcRegistrations {@Overridepublic RequestMappingHandlerMapping getRequestMappingHandlerMapping() {return new ApiRequestMappingHandlerMapping();}
}
5. 配置实现接口。 配置完成之后,接下来编写测试的控制器(Controller),实现相关接口的测试。在Controller目录下分别创建OrderV1Controller和OrderV2Controller。示例代码如下:
OrderV1Controller;
package com.example.demo.controller;import com.example.demo.apiversion.ApiVersion;
import com.example.demo.bean.JSONResult;
import org.springframework.web.bind.annotation.GetMapping;
import org.springframework.web.bind.annotation.PathVariable;
import org.springframework.web.bind.annotation.RequestMapping;
import org.springframework.web.bind.annotation.RestController;@ApiVersion(value = 1)
@RestController
@RequestMapping("api/{version}/order")
public class OrderV1Controller {@GetMapping("/delete/{orderId}")public JSONResult deleteOrderById(@PathVariable String orderId) {System.out.println("V1删除订单成功:"+orderId);return JSONResult.ok("V1删除订单成功");}@GetMapping("/detail/{orderId}")public JSONResult queryOrderById(@PathVariable String orderId) {System.out.println("V1获取订单详情成功:"+orderId);return JSONResult.ok("V1获取订单详情成功");}}
OrderV2Controller:
package com.example.demo.controller;import com.example.demo.apiversion.ApiVersion;
import com.example.demo.bean.JSONResult;
import com.example.demo.bean.Person;
import org.springframework.web.bind.annotation.*;import java.util.List;@ApiVersion(value = 2)
@RestController
@RequestMapping("api/{version}/order")
public class OrderV2Controller {@GetMapping("/detail/{orderId}")public JSONResult queryOrderById(@PathVariable String orderId) {System.out.println("V2获取订单详情成功:"+orderId);return JSONResult.ok("V2获取订单详情成功");}@GetMapping("/list")public JSONResult list(){System.out.println("V2,新增list订单列表接口");return JSONResult.ok("V2,新增list订单列表接口");}@PostMapping("/save")public JSONResult saveOrder(@RequestBody Person person){System.out.println("V2,人员新增成功");return JSONResult.ok("V2,人员新增成功");}@DeleteMapping("/deleteBatch")public JSONResult deleteBathcOrder(@RequestBody List<Long> ids){System.out.println("V2人员批量删除成功");return JSONResult.ok("V2人员批量删除成功");}}
6. 验证测试,使用postman调用接口