PyTorch gather与scatter_详解
在 PyTorch 常用的算子中,有两个理解巅峰的存在,那就是 torch.gather 与 torch.scatter_,在 Seq2Seq 、Attention、crf viterbi等结构的源码中,都可以看到这两个算子的身影,今天来详细讲解一下这两个函数。
torch.gather
使用
torch.gather 函数用于从输入张量的指定维度收集元素。收集的索引由 index 张量提供。
使用语法:torch.gather(input, dim, index, *, sparse_grad=False, out=None) → Tensor
核心参数
input:输入张量dim:指定的维度index:索引张量,包含收集元素的索引
注意
input和index必须要有相同的维度- 对于所有的
d != dim,都必须要有index.size(d) <= input.size(d)以及out的形状和index形状相同 input和index之间没有广播机制- 只有在
src.shape == index.shape时实现了反向传播
说明
以一个三维的张量为例
out[i][j][k] = input[index[i][j][k]][j][k]  # if dim == 0
out[i][j][k] = input[i][index[i][j][k]][k]  # if dim == 1
out[i][j][k] = input[i][j][index[i][j][k]]  # if dim == 2
看一个示意图(这里index和dim都是从1开始,转换成代码时 -1 即可)
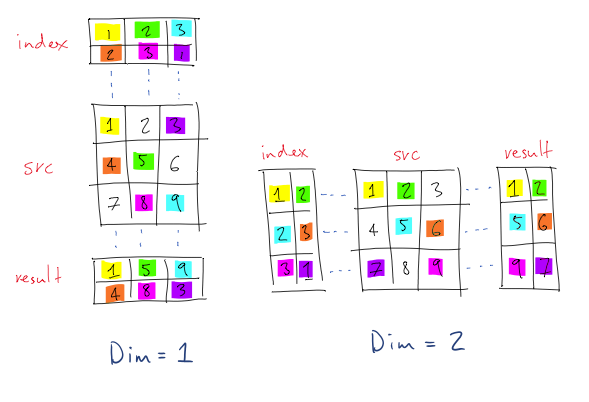
再看一个示意图,应该懂了
dim=0时
dim = 0
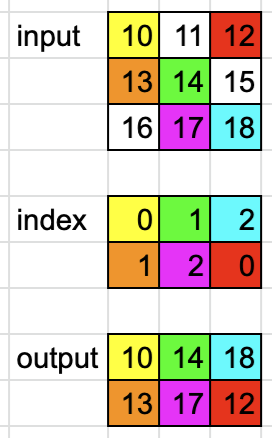
input = torch.tensor([[10, 11, 12], [13, 14, 15], [16, 17, 18]])
index = torch.tensor([[0, 1, 2], [1, 2, 0]])
# 将 index 的 dim=0 处固定 然后其他位置按顺序填充
# [['0'-0, '1'-1, '2'-2], ['1'-0, '2'-1, '0'-2]]
# [[(0, 0), (1, 1), (2, 2)], [(1, 0), (2, 1), (0, 2)]]output = torch.gather(input, dim, index)
# tensor([[10, 14, 18],
# [13, 17, 12]])
dim=1时
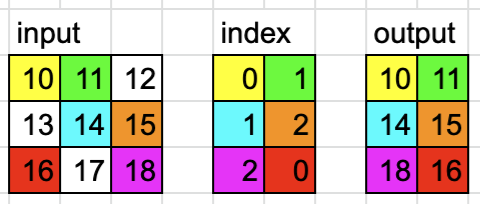
dim = 1
input = torch.tensor([[10, 11, 12], [13, 14, 15], [16, 17, 18]])
index = torch.tensor([[0, 1], [1, 2], [2, 0]])
# 将 index 的 dim=1 处固定 然后其他位置按顺序填充
# [[0-'0', 0-'1'], [1-'1', 1-'2'], [2-'2', 2-'0']]
# [[(0, 0), (0, 1)], [(1, 1), (1, 2)], [(2, 2), (2, 0)]]output = torch.gather(input, dim, index)
# tensor([[10, 11],
#         [14, 15],
#         [18, 16]])
案例
假设我们有一个 2D 张量 data,我们希望根据索引张量 index 从 data 中提取特定位置的值。
import torch# 创建一个 2D 张量 data
data = torch.tensor([[1, 2, 3],[4, 5, 6],[7, 8, 9]])
print("Data tensor:")
print(data)# 创建一个索引张量 index
index = torch.tensor([[0, 2],[1, 0],[2, 1]])
print("\nIndex tensor:")
print(index)# 使用 gather 函数
result = torch.gather(data, 1, index)
print("\nGathered result:")
print(result)
我们对上面案例进行逐步解释
-
初始张量
data:data = torch.tensor([[1, 2, 3],[4, 5, 6],[7, 8, 9]])这是一个 3x3 的张量:
tensor([[1, 2, 3],[4, 5, 6],[7, 8, 9]]) -
索引张量
index:index = torch.tensor([[0, 2],[1, 0],[2, 1]])这是一个 3x2 的张量,表示要从
data中提取的索引。 -
使用
gather函数:result = torch.gather(data, 1, index)这个操作会根据
index张量中的索引,从data张量中提取相应位置的值。具体操作如下:-
对于
data的第 0 行:index[0, 0] = 0,所以result[0, 0] = data[0, 0] = 1index[0, 1] = 2,所以result[0, 1] = data[0, 2] = 3
-
对于
data的第 1 行:index[1, 0] = 1,所以result[1, 0] = data[1, 1] = 5index[1, 1] = 0,所以result[1, 1] = data[1, 0] = 4
-
对于
data的第 2 行:index[2, 0] = 2,所以result[2, 0] = data[2, 2] = 9index[2, 1] = 1,所以result[2, 1] = data[2, 1] = 8
-
最终,result 张量为:
tensor([[1, 3],[5, 4],[9, 8]])
torch.scatter_
使用
torch.scatter_ 是 PyTorch 中一个用于在特定维度上根据索引将值写入张量的原地操作函数。
使用语法:Tensor.scatter_(dim, index, src, *, reduce=None) → Tensor
核心参数
dim:指定沿着哪个维度进行散射操作index:一个包含索引的张量,指定src中的值要写入tensor的位置src:包含要写入tensor的值的张量
注意
self,index和src必须有相同的维度- 对于所有的维度 d 必须有
index.size(d) <= src.size(d)以及index.size(d) <= self.size(d) index和src不会进行广播
说明
torch.scatter_ 其实就是torch.gather 的一个逆运算
以一个三维的张量为例
self[index[i][j][k]][j][k] = src[i][j][k]  # if dim == 0
self[i][index[i][j][k]][k] = src[i][j][k]  # if dim == 1
self[i][j][index[i][j][k]] = src[i][j][k]  # if dim == 2
另外,需要注意,scatter_ 是一个 inplace 算子
案例
先来看 dim=0 的情况
import torch
import numpy as np
src = torch.arange(1, 11).view(2, 5)
print(src)
> tensor([[ 1,  2,  3,  4,  5],[ 6,  7,  8,  9, 10]])input_tensor = torch.zeros(3, 5).long()
print(input_tensor)
> tensor([[0, 0, 0, 0, 0],[0, 0, 0, 0, 0],[0, 0, 0, 0, 0]])index_tensor = torch.tensor([[0, 1, 2, 0, 0], [2, 0, 0, 1, 2]])
print(index_tensor)
> tensor([[0, 1, 2, 0, 0],[2, 0, 0, 1, 2]])## try to manually work out the result
dim = 0
input_tensor.scatter_(dim, index_tensor, src)
print(input_tensor)
> ...
- step1:将
src的第1列分散到input _tensor的第1列。与指数张量的第1列相匹配。我们把1分散到0排,6分散到2排。
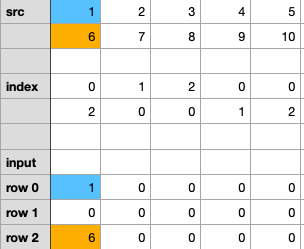
- step2:将
src的第2列分散到input _ tensor的第2列。与指数张量第2列匹配。我们把2分散到第1排,把7分散到第0排。
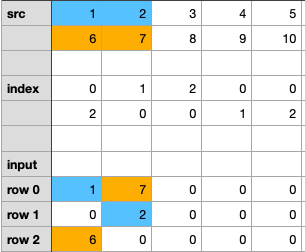
- step3/4/5:以此类推,继续对其他列做散射。最后,我们将得到如下图。
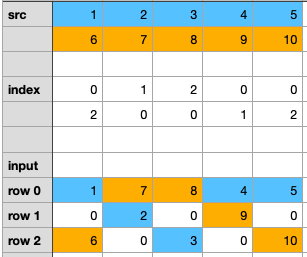
运行代码,检查最终结果
> tensor([[ 1, 7, 8, 4, 5],[ 0, 2, 0, 9, 0],[ 6, 0, 3, 0, 10]])
再来看 dim=1 的情况
import torchsrc = torch.arange(1, 11).view(2, 5)
input_tensor = torch.zeros(3, 5).long()
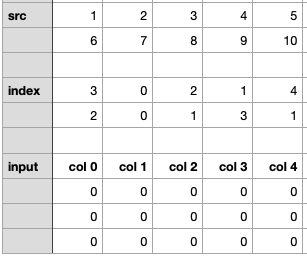
index_tensor = torch.tensor([[3, 0, 2, 1, 4], [2, 0, 1, 3, 1]])
dim = 1
input_tensor.scatter_(dim, index_tensor, src)
print(input_tensor)
- step1:将 src 的第一行散布到 input _ tensor 的第一行。1到 col3,2到 col0,3到 col2,4到 col1,5到 col4。
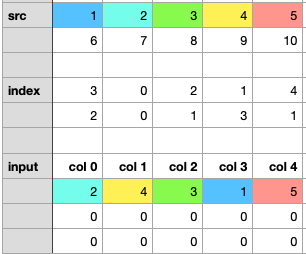
- step2:将 src 的第2行散布到 input _ tensor 的第2行。
注意:index _ tensor 的第二行有两个1。为了使更新更清晰,我将这一步分为两个子步骤。
- step2.1:分散6到 col2,7到 col0,8到 col1,9到 col3。
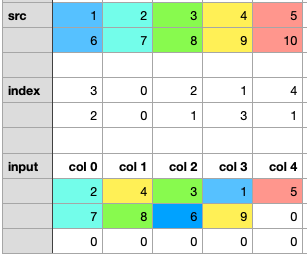
- step2.2:对10进行分散,相应的索引是1,但是该位置8已经存在了,我们需要用10来覆盖8。
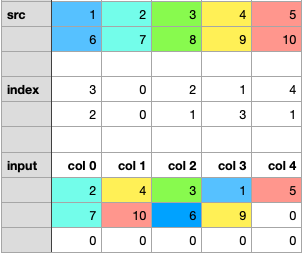
运行代码,检查最终结果
> tensor([[ 2, 4, 3, 1, 5],[ 7, 10, 6, 9, 0],[ 0, 0, 0, 0, 0]])
参考
PyTorch torch.gather
PyTorch torch.scatter_
What does gather() do in PyTorch
Understand torch.scatter_()


